<?xml version="1.0" encoding="utf-8"?>
<feed xmlns="http://www.w3.org/2005/Atom">
  <title>m.w. tremblay</title>
  
  
  <link href="http://www.mwtremblay.com/atom.xml" rel="self"/>
  
  <link href="http://www.mwtremblay.com/"/>
  <updated>2025-08-10T19:30:22.338Z</updated>
  <id>http://www.mwtremblay.com/</id>
  
  <author>
    <name>m.w. tremblay</name>
    
  </author>
  
  <generator uri="https://hexo.io/">Hexo</generator>
  
  <entry>
    <title>Apple DuoDisk Troubleshooting</title>
    <link href="http://www.mwtremblay.com/2025/08/10/apple-duodisk-troubleshooting/"/>
    <id>http://www.mwtremblay.com/2025/08/10/apple-duodisk-troubleshooting/</id>
    <published>2025-08-10T19:25:14.000Z</published>
    <updated>2025-08-10T19:30:22.338Z</updated>
    
    <content type="html"><![CDATA[<p>A friend of mine very generously gave me his childhood Apple IIe for the price of shipping. I have been really enjoying exploring it, and will certainly write something more about it later. Today I want to share a troubleshooting story regarding the Apple DuoDisk…</p><p>The DuoDisk stopped reading reliably, and would sometimes get into a state where the spindle motor would keep running even while in the BASIC prompt. I had not serviced the drives since I got it, so I decided to open it up and start some diagnostics.</p><ul><li>I cleaned the heads. Did not resolve the issue</li><li>I pulled all of the chips from their sockets and sprayed the sockets down with contact cleaner and reseated the chips. Did not resolve the issue.</li><li>I did capacitance and discharge tests on all of the electrolytic capacitors, and one of them seemed like it was going bad so I replaced it. Did not resolve the issue.</li></ul><p>I was getting a little dismayed at this point. I do not have an oscilloscope, so testing the chips to see if one was bad would be like playing whack-a-mole. Fortunately I found the <a href="https://oldcrap.org/wp-content/uploads/2023/04/apple-disk-duodisk-tech-procedures.pdf">Apple service manual</a> online. The manual has a note to the technicians that certain revisions of PCB have a risk of erasing data if a disk is in the drive when the computer is powered off. Ah ha. But, it didn’t really click with me at the time. The note said to resolve this issue, remove two small ceramic capacitors.</p><ul><li>Followed tech note and removed the two capacitors. Did not resolve the issue.</li></ul><p>I then realized that I had been testing with three disks. ProDOS, the ProDOS Users disk, and my ADTPro disk. It was refusing to boot these, so on a hunch, I tried my Apple Writer II disk.</p><ul><li>It worked.</li></ul><p>This was encouraging. I bootstrapped ADTPro over the cassette port and created a new ProDOS disk. Then I used it to check the contents of the ProDOS Users disk and the ADTPro disk. The data was still on those disk, but I have a theory on what happened. My DuoDisk was indeed affected by the erase bug, which must have occurred on these disks while the head was over the boot sector of the disks. The bulk of the data was still there, but the boot sector was nuked, and therefore the Apple II couldn’t boot from them. I thought I had the issue resolved, but…</p><p>The drive was still behaving somewhat erratically. I turned my attention to the I/O card, and ran the same troubleshooting steps that I ran on the DuoDisk PCB. I discovered that the DB-19 connector was getting a little worn out, and the wires were moving out of the connector a little too much. Apple did not put any strain relief whatsoever on these connections. I pushed the wires in as far as they would go and used superglue to hold them in place and give them some rigidity. I also wrapped some electrical tape around the cable where the wires were separated from the ribbon cable. This improved stability by a lot. But I <em>still</em> had a problem. </p><p>If I did not have the connector attached to the Apple II’s chassis, and plugged the DuoDrive in, it would work perfectly. I could shake the cable around and it wouldn’t bother it at all. If I did mount the connector to the Apple II’s chassis, then the drive would not work properly. I thought “is this some weird grounding issue?”. I grabbed my multimeter and verified that were was no such issue. What I think is going on is that when the connector is mounted to the chassis I just can’t get it seated firmly enough for it to work, given that the connector is worn out.</p><p>My temporary solution is to have the connector coming out over the top of the Apple II. The connector is too wide to fit through the slots on the back. </p><p>I’ve been using the DuoDisk all day writing disks and it’s been working perfectly. Two unrelated faults were causing chaos!</p>]]></content>


    <summary type="html">&lt;p&gt;A friend of mine very generously gave me his childhood Apple IIe for the price of shipping. I have been really enjoying exploring it, and</summary>


    <category term="apple" scheme="http://www.mwtremblay.com/tags/apple/"/>
    
    <category term="apple 2" scheme="http://www.mwtremblay.com/tags/apple-2/"/>
    
    <category term="duodisk" scheme="http://www.mwtremblay.com/tags/duodisk/"/>
    
    <category term="troubleshooting" scheme="http://www.mwtremblay.com/tags/troubleshooting/"/>
    
  </entry>
  
  <entry>
    <title>More Everything Forever</title>
    <link href="http://www.mwtremblay.com/2025/08/10/more-everything-forever/"/>
    <id>http://www.mwtremblay.com/2025/08/10/more-everything-forever/</id>
    <published>2025-08-10T18:36:44.000Z</published>
    <updated>2025-08-10T19:28:03.688Z</updated>
    
    <content type="html"><![CDATA[<h1 id="The-Book"><a href="#The-Book" class="headerlink" title="The Book"></a>The Book</h1><p>In his book <a href="https://www.hachettebookgroup.com/titles/adam-becker/more-everything-forever/9781541619593/?lens=basic-books">More Everything Forever</a>, Adam Becker provides a compelling argument, backed by interviews, documented legal proceedings, and other publicly available information, that the current A.I. mania is driven by a cult and the real-world impacts of this cult’s delusions are worse (and more real) than the apocalyptic futures they imagine.</p><p>The cult he writes of is not a singular entity but a group of organizations founded by like-minded people. They share similar beliefs and motivations, but you can’t point to a <em>single</em> organization such as Scientology. The groups the author focuses the most on are the Rationalists and the Effective Altruists. </p><p>I will try to summarize what these individuals believe…</p><blockquote><p>If we do not create artificial super intelligence (Gen A.I.) and colonize the universe then humanity is doomed. The artificial super intelligence must be developed and trained to work for our benefit at all costs. Human suffering that exists today is outweighed by the future flourishing of human civilization in space, and therefore there should be few to no limits on what we do to achieve it.</p></blockquote><p>Sounds like something out of Asimov, right?</p><p>Most of the individuals mentioned in the book are very wealthy, or otherwise have stakes in the A.I. industry. Think people such as Sam Altman, Elon Musk, and formerly wealthy Sam Bankman-Fried. They all share some combination of beliefs which circulate in the Rationalist and Effective Altruist communities. While many of these beliefs sound positive or beneficial on the surface, Becker outlines how they are rooted in the idea that humanity should exist everywhere, forever, and that there should be no limits to our consumption even if it means eating the entire universe.</p><p>Many of the ideas generated by these communities are unfathomably nutty sci-fi fever dreams. I will not summarize them here, because you should buy and read the book.</p><h1 id="My-Thoughts"><a href="#My-Thoughts" class="headerlink" title="My Thoughts"></a>My Thoughts</h1><p>As a technology person I am used to these hype cycles. Not long ago it was the blockchain. We were all supposed to become knowledgeable of and find ways to use this highly inefficient transaction registry to somehow make everything better, as promised by its hype men and believed by corporate managers and executives. That technology found niches in which it is useful (I assume in fintech, but I don’t work in that realm) but it didn’t change much. The hype bubble burst and made some people a lot of money before it did.</p><p>Now it’s all about A.I.. Companies are concerned with keeping up the pace of technology to ensure they stay competitive and relevant. I can’t blame them for ensuring their technology people are aware of these things especially when the A.I. hype men are promising them more “productivity” at lower cost and higher profits. At least I imagine this is what your average corporate boardroom types are thinking. Some of them may believe in the nuttier stuff explained in Becker’s book, but I hope that is not a large percentage.</p><p>What we currently refer to as A.I. are  actually Large Language Models (LLMs). These are essentially large indexes of words and their relationships to each other as used in language. Companies like OpenAI feed their models truly massive amounts of text scraped from internet sources, books, etc. It is impressive how much data they process, how much smart (human) engineering and labor they expend, and how accurately the LLMs can create sequences of words that make sense in English.</p><p>My technical experience with this sort of technology is limited. I have experimented with Natural Language Processing (NLP) and have learned about related concepts. There is some definite utility to this technology to <strong>augment</strong> human capabilities, but I have not seen anything yet that makes me believe they can <strong>replace</strong> human capabilities. LLMs can be fantastic accelerators for things such as language translation, parsing and summarizing large amounts of research text and data, or helping with reconstructions of very ancient text. If models are trained for their specific purposes they could be very useful to us indeed, but I do not see much real benefit of the “generalist” models that operate based on a poorly defined context. </p><p>I have tried LLM based tools for my work and found the results to be completely underwhelming. The time it takes you to explain a complex problem to a chat bot is much better spent figuring it out with your own brain. <strong>You will do a better job, believe in yourself.</strong> The LLM based chat bots are nothing more than very adept bullshit generators. There are probably two things I have used one of these things for with any level of success.</p><ul><li>Spitting out a RegEx string</li><li>Sorting a list of lines in a text file by specific criteria</li></ul><p>Both of these things are hated, tedious tasks of mine. But the thing is…they aren’t THAT hard and don’t take THAT much time to do myself. It is certainly not worth the massive expenditure of money, electricity, water, computing power, etc. spent on training these models. Every example I have seen of generative A.I. is like this. It’s garbage that pales in comparison to something created by a human being while absorbing resources better spent on human beings. </p><p>The utility of this technology compared to its environmental cost is highly questionable. If you ask the Rationalists and Effective Altruists, you may hear something like “Humanity must develop artificial super intelligence and use it to colonize the universe or we will go extinct. The harms caused today are outweighed by the future perpetual survival of humanity.”. Then they may provide astronomically large numbers (of human beings in the future), and remote probabilities to back up their claims. Becker refutes these claims in his book using interviews with actual scientists working on a broad range of related topics. In essence, what the Rationalists and Effective Altruists promise is and perhaps always will be science fiction. </p><p>The utility of this technology isn’t my biggest concern. In any field, we try things and see what works. What bothers me is that behind the chatbots and image generators there is a movement led by billionaires who want to be space-imperialists. Instead of pouring their time and money into things that would actually help people here and now, they are working towards an impossible and frankly undesirable sci-fi future where all nature is dominated by tech, and all power is in their hands.</p><p>I agree with Becker’s conclusions at the end of the book, wholeheartedly, and I strongly recommend everyone read it. </p>]]></content>


    <summary type="html">&lt;h1 id=&quot;The-Book&quot;&gt;&lt;a href=&quot;#The-Book&quot; class=&quot;headerlink&quot; title=&quot;The Book&quot;&gt;&lt;/a&gt;The Book&lt;/h1&gt;&lt;p&gt;In his book &lt;a href=&quot;https://www.hachettebookg</summary>


    <category term="adam becker" scheme="http://www.mwtremblay.com/tags/adam-becker/"/>
    
    <category term="books" scheme="http://www.mwtremblay.com/tags/books/"/>
    
    <category term="ai" scheme="http://www.mwtremblay.com/tags/ai/"/>
    
    <category term="cults" scheme="http://www.mwtremblay.com/tags/cults/"/>
    
  </entry>
  
  <entry>
    <title>Enabling telnetd on Raspbian</title>
    <link href="http://www.mwtremblay.com/2025/08/01/enable-telnet-raspbian/"/>
    <id>http://www.mwtremblay.com/2025/08/01/enable-telnet-raspbian/</id>
    <published>2025-08-01T13:17:34.000Z</published>
    <updated>2025-08-10T19:33:44.894Z</updated>
    
    <content type="html"><![CDATA[<p>I am setting up a Raspberry Pi to be a remote server (you know, a mainframe) for ancient computers that don’t have the CPU power to use SSH. I ran into an issue where after installing telnetd the service could not be found and would not start. It seems that the Debian team has done the sane thing and made sure this insecure service couldn’t be enabled by accident.</p><p>I found the solution on <a href="https://forums.raspberrypi.com/viewtopic.php?t=369500">this forum post</a> and I am putting the relevant bits here for future reference.</p><figure class="highlight plaintext"><table><tr><td class="gutter"><pre><span class="line">1</span><br><span class="line">2</span><br><span class="line">3</span><br><span class="line">4</span><br></pre></td><td class="code"><pre><span class="line">Edit /etc/inetd.conf and uncomment line 23 (line number is just a co-incidence).</span><br><span class="line"></span><br><span class="line">#:STANDARD: These are standard services.</span><br><span class="line">telnet  stream  tcp     nowait  root    /usr/sbin/tcpd  /usr/sbin/telnetd</span><br></pre></td></tr></table></figure><figure class="highlight plaintext"><table><tr><td class="gutter"><pre><span class="line">1</span><br><span class="line">2</span><br><span class="line">3</span><br></pre></td><td class="code"><pre><span class="line">Restart the inetd service</span><br><span class="line"></span><br><span class="line">sudo systemctl restart inetutils-inetd.service</span><br></pre></td></tr></table></figure>]]></content>


    <summary type="html">&lt;p&gt;I am setting up a Raspberry Pi to be a remote server (you know, a mainframe) for ancient computers that don’t have the CPU power to use S</summary>


    <category term="rasbian" scheme="http://www.mwtremblay.com/tags/rasbian/"/>
    
    <category term="telnetd" scheme="http://www.mwtremblay.com/tags/telnetd/"/>
    
    <category term="raspberrypi" scheme="http://www.mwtremblay.com/tags/raspberrypi/"/>
    
  </entry>
  
  <entry>
    <title>Expanding this Site</title>
    <link href="http://www.mwtremblay.com/2025/07/31/expanding-this-site/"/>
    <id>http://www.mwtremblay.com/2025/07/31/expanding-this-site/</id>
    <published>2025-07-31T16:31:46.000Z</published>
    <updated>2025-08-10T19:34:12.897Z</updated>
    
    <content type="html"><![CDATA[<p>I recently read <a href="https://pluralistic.net/2021/05/09/the-memex-method/">Cory Doctorow’s post</a> about using a blog as a personal <a href="https://en.wikipedia.org/wiki/Memex">Memex</a>. I have been using this site in this way, but for a very limited scope. This has served a repository for technical information helpful to my job, and in some cases I have shared links to specific posts with coworkers. Having a sort of “public notebook” is useful for such things. What this site has <strong>not</strong> been is a commonplace book. </p><p>Doctorow’s analogy to a commonplace book got me thinking… I am interested in so many things but I don’t put my thoughts or discoveries anywhere but in my head or in poorly organized notes scattered around the digital and physical realms. In some cases I store things in git repositories, but these are things that have immediate utility, they are not ideas or the seeds of ideas.</p><p>I want to think about what to post here other than my own technical notes or little projects I want to share. My interests aren’t limited to technology, so why should my blog be? I have exactly zero readers, so it doesn’t matter much, but hey…I like to think about things. Perhaps I will take one of Doctorow’s habits and write about what I read. </p>]]></content>


    <summary type="html">&lt;p&gt;I recently read &lt;a href=&quot;https://pluralistic.net/2021/05/09/the-memex-method/&quot;&gt;Cory Doctorow’s post&lt;/a&gt; about using a blog as a personal </summary>


    <category term="blog" scheme="http://www.mwtremblay.com/tags/blog/"/>
    
    <category term="memex" scheme="http://www.mwtremblay.com/tags/memex/"/>
    
    <category term="thoughts" scheme="http://www.mwtremblay.com/tags/thoughts/"/>
    
  </entry>
  
  <entry>
    <title>Smart HDMI Switch</title>
    <link href="http://www.mwtremblay.com/2025/06/02/smart-hdmi-switch/"/>
    <id>http://www.mwtremblay.com/2025/06/02/smart-hdmi-switch/</id>
    <published>2025-06-02T13:00:25.000Z</published>
    <updated>2025-08-10T19:34:50.335Z</updated>
    
    <content type="html"><![CDATA[<p>I wanted an HDMI switch that worked with Apple HomeKit so that I could include it in Scenes. Manually switching things is a drag and I wanted to keep the number of remote controllers very low.</p><p>I had a StarTech 4 port HDMI KVM that I wasn’t using any more. It was perfect for this project because it had a large case that was easy to fit a dev board in, and it used momentary contact buttons that would be easy to replace with MCU controls.</p><p>Because this had to be HomeKit compatible I needed build in wifi support, and the current chip of choice for that kind of thing is the ESP32. I was new to this platform and wanted to get this done quickly so I chose the Arduino Nano 32 board.</p><p>Then I had to decide/research how to write the code for it. I found the excellent <a href="https://github.com/HomeSpan/">HomeSpan</a> library. This made it incredibly easy to get things working. The library handles all of the wifi and HomeKit setup for you so that you can focus on the actual functionality. I completed this project in a few hours, so many kudos to the HomeSpan team!</p><p>The wiring was very simple too. The KVM had a couple pads available to pull the +5V and GND connections from, then I removed the original switches and soldered the GND connections and switch pin connections that were needed.</p><p>All my code had to do was to set the pin states needed for each input. It works perfectly, and it is VERY fast.</p><p>I have shared the Arduino sketch on GitHub, and you can find it <a href="https://github.com/mwtremblay/SmartSwitch-HDMI">here</a>.</p><p>I have plans to make more HomeKit accessories and I’m excited to explore more smart home platforms.</p>]]></content>


    <summary type="html">&lt;p&gt;I wanted an HDMI switch that worked with Apple HomeKit so that I could include it in Scenes. Manually switching things is a drag and I wa</summary>


    <category term="arduino" scheme="http://www.mwtremblay.com/tags/arduino/"/>
    
    <category term="esp32" scheme="http://www.mwtremblay.com/tags/esp32/"/>
    
    <category term="homespan" scheme="http://www.mwtremblay.com/tags/homespan/"/>
    
    <category term="c++" scheme="http://www.mwtremblay.com/tags/c/"/>
    
    <category term="hdmi" scheme="http://www.mwtremblay.com/tags/hdmi/"/>
    
    <category term="gaming" scheme="http://www.mwtremblay.com/tags/gaming/"/>
    
  </entry>
  
  <entry>
    <title>Avoiding List Tab Download Crashes in Maximo</title>
    <link href="http://www.mwtremblay.com/2025/06/02/avoding-list-tab-download-crashes/"/>
    <id>http://www.mwtremblay.com/2025/06/02/avoding-list-tab-download-crashes/</id>
    <published>2025-06-02T12:17:56.000Z</published>
    <updated>2025-08-10T19:35:29.989Z</updated>
    
    <content type="html"><![CDATA[<p>Recently we observed JVM crashes on one of our UI servers that we traced back the XLS emitter, triggered by downloads from the list tab. A user was apparently trying to download more data from the list tab than the emitter could handle.</p><p>Investigation showed that in this environment, the system property <code>webclient.maxdownloadrows</code> had not been set.</p><p>We set this property to 1000 to limit the size of the recordset and the issue was resovled.</p>]]></content>


    <summary type="html">&lt;p&gt;Recently we observed JVM crashes on one of our UI servers that we traced back the XLS emitter, triggered by downloads from the list tab. </summary>


    <category term="maximo" scheme="http://www.mwtremblay.com/tags/maximo/"/>
    
    <category term="ibm" scheme="http://www.mwtremblay.com/tags/ibm/"/>
    
    <category term="jvm" scheme="http://www.mwtremblay.com/tags/jvm/"/>
    
    <category term="java" scheme="http://www.mwtremblay.com/tags/java/"/>
    
  </entry>
  
  <entry>
    <title>Maximo Installation Command Reference</title>
    <link href="http://www.mwtremblay.com/2025/01/08/maximo-install-reference/"/>
    <id>http://www.mwtremblay.com/2025/01/08/maximo-install-reference/</id>
    <published>2025-01-08T18:05:18.000Z</published>
    <updated>2025-08-10T19:36:07.264Z</updated>
    
    <content type="html"><![CDATA[<p>Personal reference for useful commands.</p><h2 id="Bypass-verification-checks-for-IBM-Installation-Manager"><a href="#Bypass-verification-checks-for-IBM-Installation-Manager" class="headerlink" title="Bypass verification checks for IBM Installation Manager"></a>Bypass verification checks for IBM Installation Manager</h2><figure class="highlight plaintext"><table><tr><td class="gutter"><pre><span class="line">1</span><br></pre></td><td class="code"><pre><span class="line">set BYPASS_PRS = True</span><br></pre></td></tr></table></figure><h2 id="Run-Maximo-install-on-DB"><a href="#Run-Maximo-install-on-DB" class="headerlink" title="Run Maximo install on DB"></a>Run Maximo install on DB</h2><p>Param Ref:<br>-s = Schema Name<br>-t = Tablespace Name<br>-imaxdemo = Tells installer to populate the database with demo data from /SMP/maximo/tools/maximo/en/maxdemo.ora</p><figure class="highlight plaintext"><table><tr><td class="gutter"><pre><span class="line">1</span><br></pre></td><td class="code"><pre><span class="line">/SMP/maximo/tools/maximo/maxinst -sMAXIMO -tMAXIMO -imaxdemo</span><br></pre></td></tr></table></figure><h2 id="Start-DB-config"><a href="#Start-DB-config" class="headerlink" title="Start DB config"></a>Start DB config</h2><figure class="highlight plaintext"><table><tr><td class="gutter"><pre><span class="line">1</span><br></pre></td><td class="code"><pre><span class="line">/SMP/maximo/tools/maximo/configdb.bat</span><br></pre></td></tr></table></figure><h2 id="Run-DB-integrity-checker"><a href="#Run-DB-integrity-checker" class="headerlink" title="Run DB integrity checker"></a>Run DB integrity checker</h2><figure class="highlight plaintext"><table><tr><td class="gutter"><pre><span class="line">1</span><br></pre></td><td class="code"><pre><span class="line">/SMP/maximo/tools/maximo/integrityui.bat</span><br></pre></td></tr></table></figure><h2 id="Build-Maximo-EAR"><a href="#Build-Maximo-EAR" class="headerlink" title="Build Maximo EAR"></a>Build Maximo EAR</h2><figure class="highlight plaintext"><table><tr><td class="gutter"><pre><span class="line">1</span><br></pre></td><td class="code"><pre><span class="line">/SMP/maximo/deployment/buildmaximoearwas8.bat</span><br></pre></td></tr></table></figure><h2 id="Encrypt-Maximo-properties"><a href="#Encrypt-Maximo-properties" class="headerlink" title="Encrypt Maximo properties"></a>Encrypt Maximo properties</h2><figure class="highlight plaintext"><table><tr><td class="gutter"><pre><span class="line">1</span><br></pre></td><td class="code"><pre><span class="line">/SMP/maximo/tools/maximo/encryptproperties.bat</span><br></pre></td></tr></table></figure><h2 id="Manage-Windows-services-for-WebSphere"><a href="#Manage-Windows-services-for-WebSphere" class="headerlink" title="Manage Windows services for WebSphere"></a>Manage Windows services for WebSphere</h2><figure class="highlight plaintext"><table><tr><td class="gutter"><pre><span class="line">1</span><br></pre></td><td class="code"><pre><span class="line">/AppServer/bin/wasservicehelper.bat</span><br></pre></td></tr></table></figure><h2 id="Command-line-WebSphere-node-sync"><a href="#Command-line-WebSphere-node-sync" class="headerlink" title="Command line WebSphere node sync"></a>Command line WebSphere node sync</h2><figure class="highlight plaintext"><table><tr><td class="gutter"><pre><span class="line">1</span><br></pre></td><td class="code"><pre><span class="line">/AppServer/profiles/AppSrv01/bin/syncnode.bat HOSTNAME -username WASADMIN -password WASADMINPASSWORD</span><br></pre></td></tr></table></figure>]]></content>


    <summary type="html">&lt;p&gt;Personal reference for useful commands.&lt;/p&gt;
&lt;h2 id=&quot;Bypass-verification-checks-for-IBM-Installation-Manager&quot;&gt;&lt;a href=&quot;#Bypass-verificatio</summary>


    <category term="maximo" scheme="http://www.mwtremblay.com/tags/maximo/"/>
    
  </entry>
  
  <entry>
    <title>Maximo Automation Scripting Practices</title>
    <link href="http://www.mwtremblay.com/2024/11/02/MaximoAutomationScriptingPractices/"/>
    <id>http://www.mwtremblay.com/2024/11/02/MaximoAutomationScriptingPractices/</id>
    <published>2024-11-02T03:39:00.000Z</published>
    <updated>2025-08-10T19:35:58.325Z</updated>
    
    <content type="html"><![CDATA[<p>I hesitate to call this post a “Best Practices” post, because who am I to prescribe a best practice? I won’t call it that. Instead this is a list of practices that I think are sane and maintainable over the long term. </p><p>I am currently on a project overhauling a Maximo instance that has gotten to the point where it is hard to maintain and debug, and there are bugs a plenty. It is a spiderweb of duplicitous workflows and automation script spaghetti code. This instance reveals some dangers of “low code” platforms. People seem to get the idea that they do not have to be concerned with clean programming practices or long term maintainability. </p><p><b>Write good clean code in Automation Scripts</b></p><p>This should be obvious, but it apparently is not. Just because we are using a script interpreter built into a web application doesn’t mean we should be lazy about it. Properly comment and structure your code. </p><p><b>Use good script and launchpoint names</b></p><p>Something that I like to do is name my scripts for the object and method they are working on. <code>ASSET.SAVE</code> for example, or <code>WORKORDER.WORKTYPE.VALIDATE</code>. This will make it easy to find an understand what these scripts are for. Name the launchpoint the same, because you need to migrate this as well and this will make it easier on you.</p><figure class="highlight python"><table><tr><td class="gutter"><pre><span class="line">1</span><br><span class="line">2</span><br><span class="line">3</span><br><span class="line">4</span><br><span class="line">5</span><br><span class="line">6</span><br><span class="line">7</span><br><span class="line">8</span><br><span class="line">9</span><br><span class="line">10</span><br><span class="line">11</span><br><span class="line">12</span><br><span class="line">13</span><br><span class="line">14</span><br></pre></td><td class="code"><pre><span class="line"><span class="comment"># Script: ASSET.SAVE</span></span><br><span class="line"><span class="comment"># Launchpoint: ASSET.SAVE</span></span><br><span class="line"></span><br><span class="line"><span class="keyword">from</span> psdi.mbo <span class="keyword">import</span> MboConstants</span><br><span class="line"></span><br><span class="line"><span class="keyword">def</span> <span class="title function_">setLocation</span>():</span><br><span class="line">    mbo.setValue(<span class="string">&quot;LOCATION&quot;</span>, <span class="string">&quot;FOO&quot;</span>, MboConstants.NOACCESSCHECK)</span><br><span class="line"></span><br><span class="line"><span class="keyword">def</span> <span class="title function_">setSomethingElse</span>():</span><br><span class="line">    mbo.setValue(<span class="string">&quot;SOMETHINGELSE&quot;</span>, <span class="string">&quot;FOO&quot;</span>, MboConstants.NOACCESSCHECK)</span><br><span class="line"></span><br><span class="line">setLocation()</span><br><span class="line">setSomethingElse()</span><br><span class="line"></span><br></pre></td></tr></table></figure><p>The example above shows a pattern I’ve been following. Keeping all logic related to asset.save in one script, instead of many with their own unique names, is much easier to maintain and debug. I have seen examples on my current project where seemingly no pattern was followed, and finding all the bits of pieces of their business logic is more of a scavenger hunt than it should be.</p><p>Using the Python function declaration <code>def myFunction():</code> I can use good program structure to keep all of the different things you might need clean and easy to modify or turn on or off. If you are just testing something, or the customer asks you to disable it, it’s as simple as removing or commenting out your function calls at the bottom of the script.</p><p>No matter what it is, even if it is the only thing the script does at the moment, just put it under a function declaration. It could help you in the future.</p><p><b>The Variables tab is pointless and bad</b></p><p>For reasons that I do not understand, there is a tab in the automation script editor called Variables. It is useless, and actually makes things much much harder to read and understand. Don’t use it. Python already has variables, and the MBO framework is available to you. Why use anything else? Keep things clean and easy to read.</p><p><b>Code reuse? Code reuse!!</b></p><p>You can and should employ code reuse in your automation scripts. Seasoned programmers understand this concept well, there are bits of code you may use in more than one place and it’s often appropriate to put these somewhere they can be called by other scripts or classes.</p><p>In Maximo these are referred to as LIBRARY scripts. IBM has a page on it <a href="https://www.ibm.com/docs/en/maximo-manage/continuous-delivery?topic=scripts-reusable-library-in-automation">here</a>.</p><p>From their examples, they have a script called MULTIPLY.</p><figure class="highlight plaintext"><table><tr><td class="gutter"><pre><span class="line">1</span><br></pre></td><td class="code"><pre><span class="line">z=x*y</span><br></pre></td></tr></table></figure><p>They then use this script in another script. I’ll add more comments than their example has.</p><figure class="highlight python"><table><tr><td class="gutter"><pre><span class="line">1</span><br><span class="line">2</span><br><span class="line">3</span><br><span class="line">4</span><br><span class="line">5</span><br><span class="line">6</span><br><span class="line">7</span><br><span class="line">8</span><br><span class="line">9</span><br><span class="line">10</span><br><span class="line">11</span><br><span class="line">12</span><br><span class="line">13</span><br><span class="line">14</span><br><span class="line">15</span><br><span class="line">16</span><br><span class="line">17</span><br><span class="line">18</span><br><span class="line">19</span><br><span class="line">20</span><br><span class="line">21</span><br><span class="line">22</span><br></pre></td><td class="code"><pre><span class="line"><span class="comment"># here is an example of a debug logging</span></span><br><span class="line">service.log(<span class="string">&quot;I want to multiply 2 numbers and log the result&quot;</span>)</span><br><span class="line"></span><br><span class="line"><span class="comment"># import the HashMap from the java.util library. </span></span><br><span class="line"><span class="comment"># we will use a hashmap to store the parameters we</span></span><br><span class="line"><span class="comment"># pass to our MULTIPLY script</span></span><br><span class="line"></span><br><span class="line"><span class="keyword">from</span> java.util <span class="keyword">import</span> HashMap</span><br><span class="line">a=<span class="number">3</span></span><br><span class="line">b=<span class="number">2</span></span><br><span class="line"></span><br><span class="line"><span class="comment"># declare our hashmap and put the values in it</span></span><br><span class="line">ctx = HashMap()</span><br><span class="line">ctx.put(<span class="string">&quot;x&quot;</span>,a)</span><br><span class="line">ctx.put(<span class="string">&quot;y&quot;</span>,b)</span><br><span class="line"></span><br><span class="line"><span class="comment"># and here is where we call our library script</span></span><br><span class="line"><span class="comment"># service.invokeScript(&quot;MYSCRIPT&quot;,params)</span></span><br><span class="line"></span><br><span class="line">service.invokeScript(<span class="string">&quot;MULTIPLY&quot;</span>,ctx)</span><br><span class="line">service.log(<span class="string">&quot;the result is &quot;</span>+<span class="built_in">str</span>(ctx.get(<span class="string">&quot;z&quot;</span>)))</span><br><span class="line"></span><br></pre></td></tr></table></figure><p>We name our library scripts clearly, like <code>LIBRARY.CALCULATETHEVOLUMEOFTHEUNIVERSE</code>.</p><p><b>UPDATE: Nov 2024</b></p><p>IBM has added the ability to invoke individual functions within library scripts, which makes them a lot more useful. To invoke a function within a library script the library script must have the “Allow Invoking Script Functions” option selected. Then to use the functions in your library the syntax is as follows.</p><figure class="highlight python"><table><tr><td class="gutter"><pre><span class="line">1</span><br></pre></td><td class="code"><pre><span class="line">service.invokeScript(<span class="string">&quot;LIBRARY.SCRIPT.NAME&quot;</span>,<span class="string">&quot;functionName&quot;</span>,params)</span><br></pre></td></tr></table></figure><p>When used appropriately, code reuse means you’ll have less code to maintain. That means less work. We all love less work, right?</p><p><b>Read Bruno’s site</b></p><p>Develop in Maximo for long enough and you’ll wind up on <a href="https://bportaluri.com/">Bruno’s site</a>. Bruno has a wealth of information available and the developers on my team use his site frequently. A link particularly relevant to this post is his <a href="https://bportaluri.com/wp-content/downloads/MaximoAutomationScriptsQuickReference.pdf">automation scripting quick reference</a>. I always have this open if I am writing automation scripts. I do not have a good memory.</p><p><b>Conclusion</b></p><p>And that’s it! There’s not much to it, I just wanted to put this out there. If you are just getting started using Maximo, or are new to using automation scripting, I hope something here gives you a head start. If you are used to Java customization then this will all be easy to pick up, and you probably didn’t need to read this anyway. For those that are coming to Maximo from a different background, I hope this helps you avoid future headaches.</p><p>BTW: If you are looking at using a Workflow for something, ask “hey can this just be an escalation or automation script instead?”. Asking that question often could save you a LOT of future headaches. :-)</p>]]></content>


    <summary type="html">&lt;p&gt;I hesitate to call this post a “Best Practices” post, because who am I to prescribe a best practice? I won’t call it that. Instead this i</summary>


    <category term="maximo" scheme="http://www.mwtremblay.com/tags/maximo/"/>
    
    <category term="python" scheme="http://www.mwtremblay.com/tags/python/"/>
    
    <category term="automation scripting" scheme="http://www.mwtremblay.com/tags/automation-scripting/"/>
    
  </entry>
  
  <entry>
    <title>Seemingly Silly SQL</title>
    <link href="http://www.mwtremblay.com/2024/04/07/seemingly-silly-sql/"/>
    <id>http://www.mwtremblay.com/2024/04/07/seemingly-silly-sql/</id>
    <published>2024-04-07T18:01:40.000Z</published>
    <updated>2024-11-02T02:44:49.477Z</updated>
    
    <content type="html"><![CDATA[<p>Recently I had to fix a report that was broken from some changes we made while implementing a new financial tracking process for our customer. A previous development team had implemented work order related cost tracking without using Maximo’s out-of-box financial tracking functionality. They created a table which stored certain dollar amounts associated with their process. There is a row per dollar amount entered. The customer wanted to use more of the out-of-box financial tracking capabilites and expand their usage of the application. As a part of these changes, we stopped using this custom table, but preserved the capability to enter in a sequence of dollar amounts (pending a larger process overhaul) by using attributes on the work order table itself.</p><p>This change had the side effect of breaking a report that used this custom table. The top portion of the report was trivial to change to pull its values from the new places, but the bottom portion has a table which displayed rows from that custom table we no longer use. We did not want to change the structure or functionality of the report, so I now had to find a way to output attributes that were now a part of a single row/record, in multiple rows in order to populate the table on the report.</p><p>Take this list of attributes as an example</p><p><code>wonum, fundingnum, fund0, fund1, fund2, fund3</code></p><p>To output this one row, as four rows, I used <code>UNION</code></p><figure class="highlight sql"><table><tr><td class="gutter"><pre><span class="line">1</span><br><span class="line">2</span><br><span class="line">3</span><br><span class="line">4</span><br><span class="line">5</span><br><span class="line">6</span><br><span class="line">7</span><br><span class="line">8</span><br><span class="line">9</span><br><span class="line">10</span><br><span class="line">11</span><br><span class="line">12</span><br><span class="line">13</span><br><span class="line">14</span><br><span class="line">15</span><br><span class="line">16</span><br><span class="line">17</span><br><span class="line">18</span><br><span class="line">19</span><br><span class="line">20</span><br><span class="line">21</span><br><span class="line">22</span><br><span class="line">23</span><br><span class="line">24</span><br><span class="line">25</span><br><span class="line">26</span><br><span class="line">27</span><br><span class="line">28</span><br><span class="line">29</span><br><span class="line">30</span><br><span class="line">31</span><br><span class="line">32</span><br><span class="line">33</span><br><span class="line">34</span><br><span class="line">35</span><br><span class="line">36</span><br><span class="line">37</span><br><span class="line">38</span><br><span class="line">39</span><br><span class="line">40</span><br><span class="line">41</span><br><span class="line">42</span><br><span class="line">43</span><br><span class="line">44</span><br><span class="line">45</span><br><span class="line">46</span><br><span class="line">47</span><br><span class="line">48</span><br></pre></td><td class="code"><pre><span class="line"><span class="keyword">SELECT</span> </span><br><span class="line">    wonum, </span><br><span class="line">    fundingnum, </span><br><span class="line">    fund</span><br><span class="line">  <span class="keyword">FROM</span> (</span><br><span class="line">    <span class="keyword">SELECT</span></span><br><span class="line">      wo.wonum,</span><br><span class="line">      <span class="number">0</span> fundingnum,</span><br><span class="line">      wo.fund0 fund</span><br><span class="line">    <span class="keyword">FROM</span> workorder wo</span><br><span class="line">    <span class="keyword">WHERE</span> </span><br><span class="line">      wo.wonum <span class="operator">=</span> :wonum</span><br><span class="line">      <span class="keyword">AND</span> wo.siteid <span class="operator">=</span> :siteid</span><br><span class="line">    </span><br><span class="line">    <span class="keyword">UNION</span></span><br><span class="line">    </span><br><span class="line">    <span class="keyword">SELECT</span></span><br><span class="line">      wo.wonum,</span><br><span class="line">      <span class="number">1</span> fundingnum,</span><br><span class="line">      wo.fund1 fund</span><br><span class="line">    <span class="keyword">FROM</span> workorder wo</span><br><span class="line">   <span class="keyword">WHERE</span> </span><br><span class="line">     wo.wonum <span class="operator">=</span> :wonum</span><br><span class="line">     <span class="keyword">AND</span> wo.siteid <span class="operator">=</span> :siteid</span><br><span class="line"></span><br><span class="line">    <span class="keyword">UNION</span></span><br><span class="line"></span><br><span class="line">    <span class="keyword">SELECT</span></span><br><span class="line">      wo.wonum,</span><br><span class="line">      <span class="number">2</span> fundingnum,</span><br><span class="line">      wo.fund2 fund</span><br><span class="line">    <span class="keyword">FROM</span> workorder wo</span><br><span class="line">   <span class="keyword">WHERE</span> </span><br><span class="line">     wo.wonum <span class="operator">=</span> :wonum</span><br><span class="line">     <span class="keyword">AND</span> wo.siteid <span class="operator">=</span> :siteid</span><br><span class="line"></span><br><span class="line">    <span class="keyword">UNION</span></span><br><span class="line"></span><br><span class="line">    <span class="keyword">SELECT</span></span><br><span class="line">      wo.wonum,</span><br><span class="line">      <span class="number">3</span> fundingnum,</span><br><span class="line">      wo.fund3 fund</span><br><span class="line">    <span class="keyword">FROM</span> workorder wo</span><br><span class="line">   <span class="keyword">WHERE</span> </span><br><span class="line">     wo.wonum <span class="operator">=</span> :wonum</span><br><span class="line">     <span class="keyword">AND</span> wo.siteid <span class="operator">=</span> :siteid</span><br><span class="line"></span><br><span class="line">  ) <span class="keyword">ORDER</span> <span class="keyword">BY</span> fundingnum <span class="keyword">ASC</span>;</span><br></pre></td></tr></table></figure><p>It sure looks silly, but it outputs the data in rows to populate the table on the report properly and Oracle’s explain plan said the cost was 40, great!</p><p>Then I got curious, how bad would the cost get if I put the <code>WHERE</code> clause on the outer <code>SELECT</code> instead of on the individual <code>SELECT</code> statements.</p><figure class="highlight sql"><table><tr><td class="gutter"><pre><span class="line">1</span><br><span class="line">2</span><br><span class="line">3</span><br><span class="line">4</span><br><span class="line">5</span><br><span class="line">6</span><br><span class="line">7</span><br><span class="line">8</span><br><span class="line">9</span><br><span class="line">10</span><br><span class="line">11</span><br><span class="line">12</span><br><span class="line">13</span><br><span class="line">14</span><br><span class="line">15</span><br><span class="line">16</span><br><span class="line">17</span><br><span class="line">18</span><br><span class="line">19</span><br><span class="line">20</span><br><span class="line">21</span><br><span class="line">22</span><br><span class="line">23</span><br><span class="line">24</span><br><span class="line">25</span><br><span class="line">26</span><br><span class="line">27</span><br><span class="line">28</span><br><span class="line">29</span><br><span class="line">30</span><br><span class="line">31</span><br><span class="line">32</span><br><span class="line">33</span><br><span class="line">34</span><br><span class="line">35</span><br><span class="line">36</span><br><span class="line">37</span><br><span class="line">38</span><br></pre></td><td class="code"><pre><span class="line"><span class="keyword">SELECT</span> </span><br><span class="line">    wonum, </span><br><span class="line">    fundingnum, </span><br><span class="line">    fund</span><br><span class="line">  <span class="keyword">FROM</span> (</span><br><span class="line">    <span class="keyword">SELECT</span></span><br><span class="line">      wo.wonum,</span><br><span class="line">      <span class="number">0</span> fundingnum,</span><br><span class="line">      wo.fund0 fund</span><br><span class="line">    <span class="keyword">FROM</span> workorder wo</span><br><span class="line"></span><br><span class="line">    <span class="keyword">UNION</span></span><br><span class="line">    </span><br><span class="line">    <span class="keyword">SELECT</span></span><br><span class="line">      wo.wonum,</span><br><span class="line">      <span class="number">1</span> fundingnum,</span><br><span class="line">      wo.fund1 fund</span><br><span class="line">    <span class="keyword">FROM</span> workorder wo</span><br><span class="line"></span><br><span class="line">    <span class="keyword">UNION</span></span><br><span class="line"></span><br><span class="line">    <span class="keyword">SELECT</span></span><br><span class="line">      wo.wonum,</span><br><span class="line">      <span class="number">2</span> fundingnum,</span><br><span class="line">      wo.fund2 fund</span><br><span class="line">    <span class="keyword">FROM</span> workorder wo</span><br><span class="line"></span><br><span class="line">    <span class="keyword">UNION</span></span><br><span class="line"></span><br><span class="line">    <span class="keyword">SELECT</span></span><br><span class="line">      wo.wonum,</span><br><span class="line">      <span class="number">3</span> fundingnum,</span><br><span class="line">      wo.fund3 fund</span><br><span class="line">    <span class="keyword">FROM</span> workorder wo</span><br><span class="line">  ) </span><br><span class="line">  <span class="keyword">WHERE</span> wo.wonum <span class="operator">=</span> :wonum</span><br><span class="line">    <span class="keyword">AND</span> wo.siteid <span class="operator">=</span> :siteid</span><br><span class="line">  <span class="keyword">ORDER</span> <span class="keyword">BY</span> fundingnum <span class="keyword">ASC</span>;</span><br></pre></td></tr></table></figure><p>This increased the query cost dramatically. The cost according to the explain plan was somewhere in the millions, while the cost of the other version was just 40. The reason for this, is that in the expensive query each <code>SELECT</code> is pulling in the <strong>entire</strong> workorder table, and each <code>UNION</code> is de-duplicating the results of each <code>SELECT</code>. This query has to do this four times before it can finally filter down the results to the one record needed. In the performant query, each <code>SELECT</code> is only returning one row, and since the row returned by each <code>SELECT</code> is different, the <code>UNION</code> doesn’t have to de-duplicate. Plus the dataset is already <strong>much</strong> smaller. Imagine how bad it would be if I had used <code>UNION ALL</code> instead of <code>UNION</code>!</p><p>The lesson here is that it matters where you put your <code>WHERE</code> clauses in queries. You have to keep in mind the size of the datasets you are pulling in, and how much work every operation is going to have to do. </p><p>Also, you aren’t always going to have ideal data to work with and….sometimes…you may have to do silly things like balloon one row into four…</p><p>I did put in a comment saying something to the effect of <code>/* I know this looks dumb but...*/</code></p>]]></content>


    <summary type="html">&lt;p&gt;Recently I had to fix a report that was broken from some changes we made while implementing a new financial tracking process for our cust</summary>


  </entry>
  
  <entry>
    <title>Installing an SSD in a PowerMac G4!</title>
    <link href="http://www.mwtremblay.com/2023/06/16/powermacg4/"/>
    <id>http://www.mwtremblay.com/2023/06/16/powermacg4/</id>
    <published>2023-06-16T14:08:25.000Z</published>
    <updated>2025-08-10T19:36:57.143Z</updated>
    
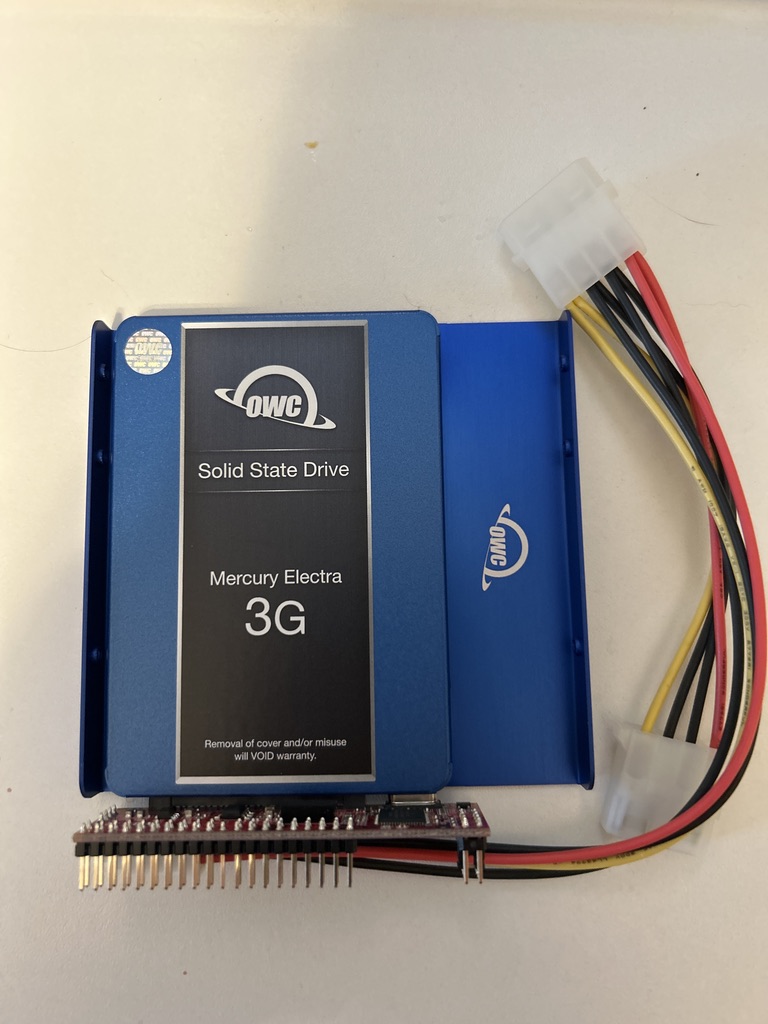
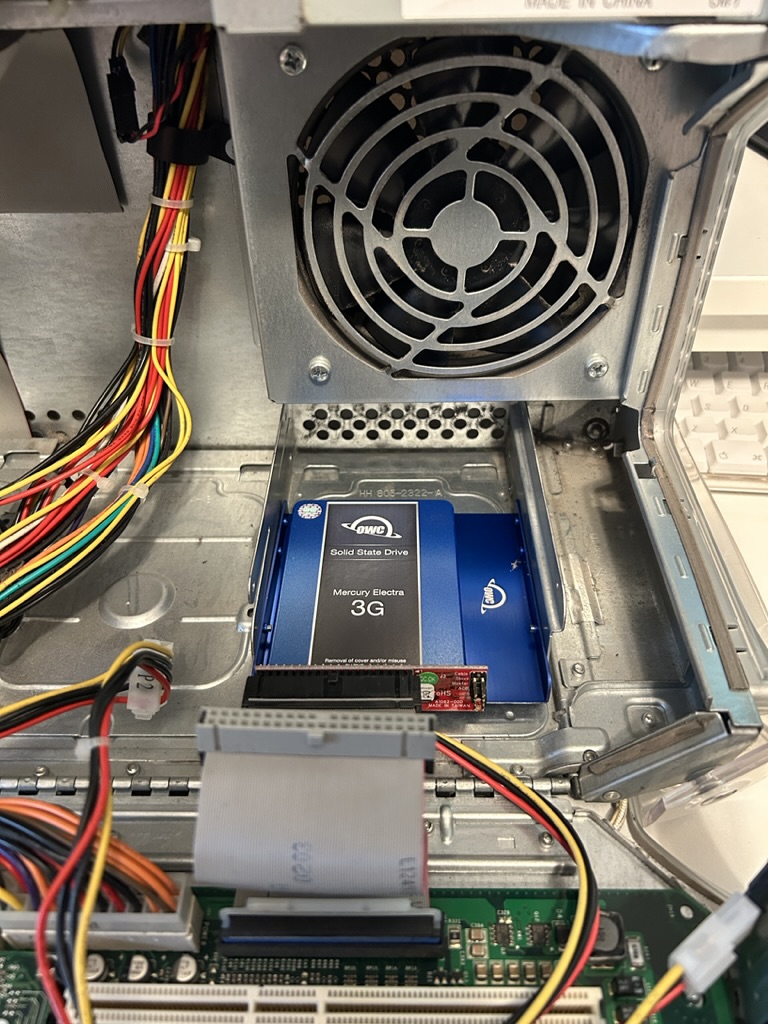
    <content type="html"><![CDATA[<p>All computers must use an SSD now. It’s the law.</p><p>Even an Apple PowerMac G4 Quicksilver from 2002!</p><p>OWC, of course, sells a <a href="https://eshop.macsales.com/shop/ssd/owc/power-mac-g4/2002-2004">kit</a> for this upgrade. Like many of us they don’t seem to want to let old Macs die!</p><p><img src="/2023/06/16/powermacg4/owckit.jpeg" alt="SSD kit from OWC"></p><p>Installation of the kit couldn’t be any simpler. It just replaces the stock HDD using the existing PATA ribbon cable. OWC includes a 2.5” to 3.5” mounting plate so that everything is nice and secure.</p><p><img src="/2023/06/16/powermacg4/owckitinstalled.jpeg" alt="SSD kit installed"></p><p>I wanted to restore the software on this Mac to what it left the factory with 21 years. Fortunately, Macintosh Garden has images of the <a href="https://macintoshgarden.org/apps/power-mac-g4-quicksilver-2002-restore-discs">original software restore discs</a>. I downloaded these and burned them onto CD-Rs. Oh yes, some of us still burn discs.</p><p>The restore disc didn’t recognize the SSD at first because it was unformatted. There wasn’t an option to open up the Drive Setup to format the drive. I had a copy of Mac OS 9 Lives, so I booted off of that and was able to format the SSD. Then I was able to restore using the restoration media.</p><p>It was fun seeing the first boot experience on this PowerMac, but after that I decided to install the pinacle of PowerPC operating systems… Mac OS X Tiger. </p><p>The Tiger installation went just fine, no surprises and it runs great on the PowerMac G4.</p><p>This computer will be mainly used for old games or that odd time where you need an older version of Mac OS. </p><p>Please don’t throw your old computers in the trash. Some people like to install new technology in them and use them even if they’re over 20 years old!</p>]]></content>


    <summary type="html">&lt;p&gt;All computers must use an SSD now. It’s the law.&lt;/p&gt;
&lt;p&gt;Even an Apple PowerMac G4 Quicksilver from 2002!&lt;/p&gt;
&lt;p&gt;OWC, of course, sells a &lt;</summary>


    <category term="apple" scheme="http://www.mwtremblay.com/tags/apple/"/>
    
    <category term="mac" scheme="http://www.mwtremblay.com/tags/mac/"/>
    
    <category term="power mac" scheme="http://www.mwtremblay.com/tags/power-mac/"/>
    
    <category term="g4" scheme="http://www.mwtremblay.com/tags/g4/"/>
    
    <category term="quicksilver" scheme="http://www.mwtremblay.com/tags/quicksilver/"/>
    
    <category term="ssd" scheme="http://www.mwtremblay.com/tags/ssd/"/>
    
  </entry>
  
  <entry>
    <title>Using OpenCore Legacy Patcher on my 2012 Mac Pro</title>
    <link href="http://www.mwtremblay.com/2023/06/08/macpro/"/>
    <id>http://www.mwtremblay.com/2023/06/08/macpro/</id>
    <published>2023-06-08T23:40:58.000Z</published>
    <updated>2025-08-10T19:38:14.613Z</updated>
    
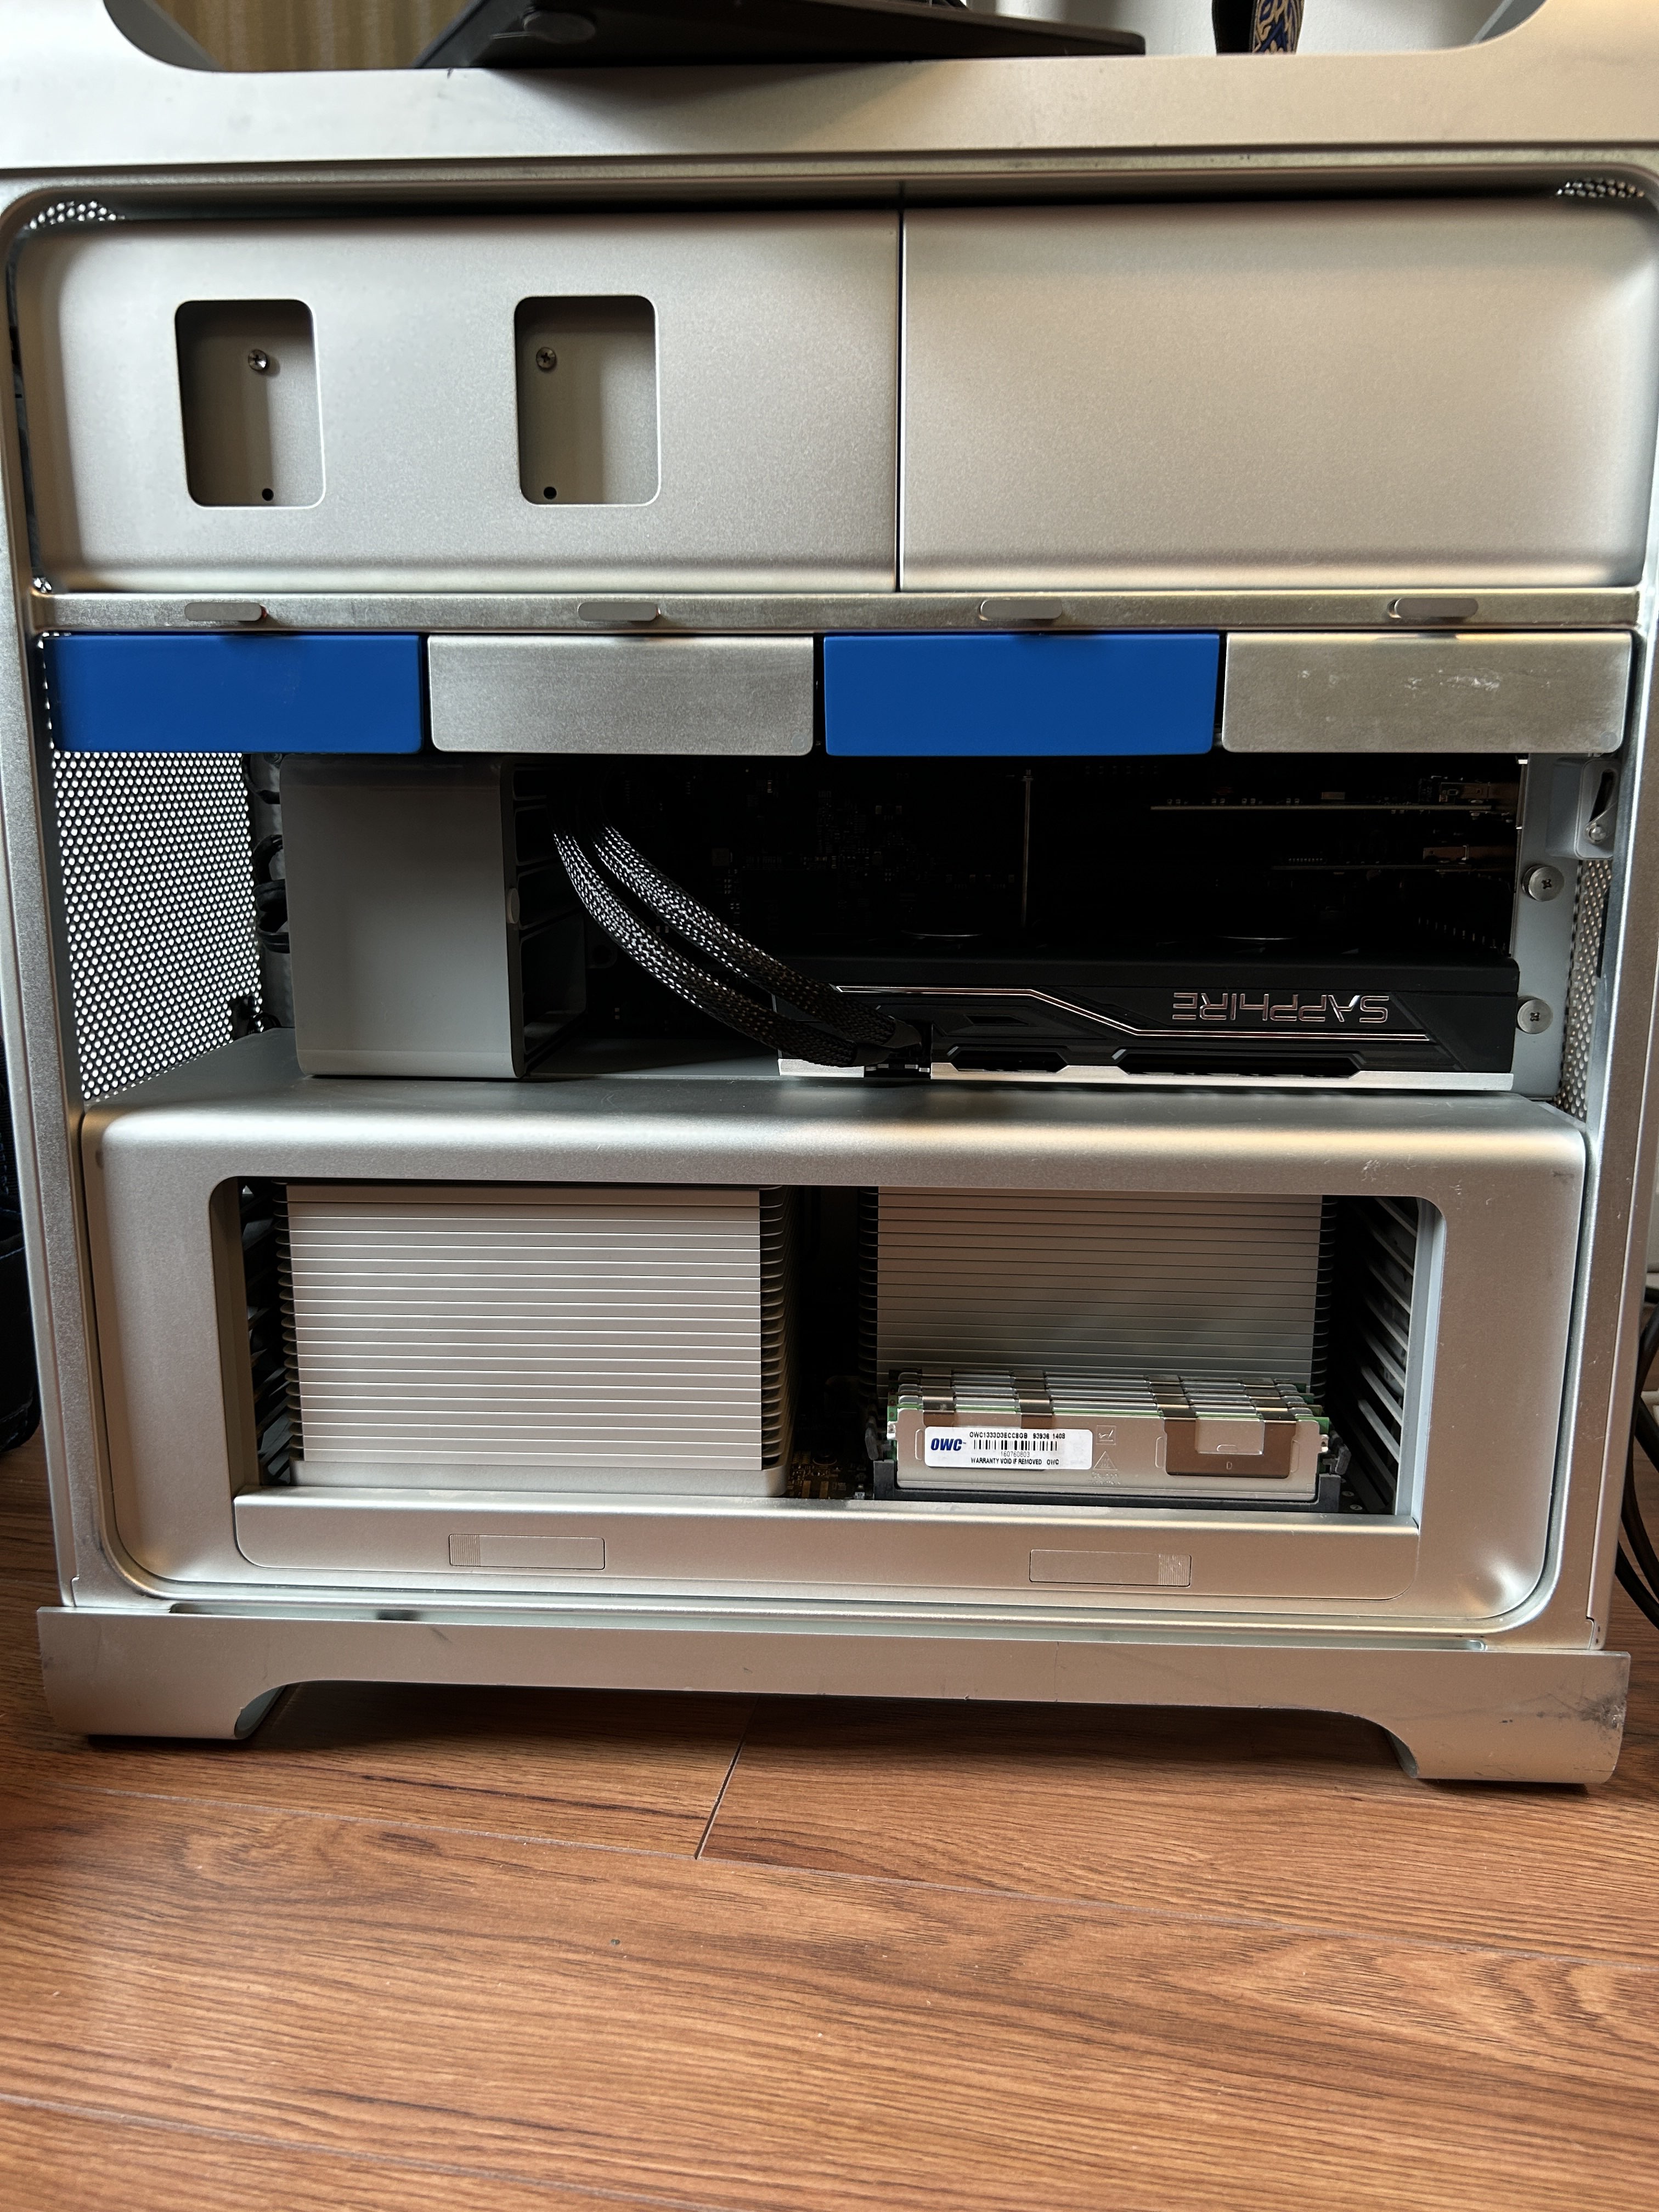
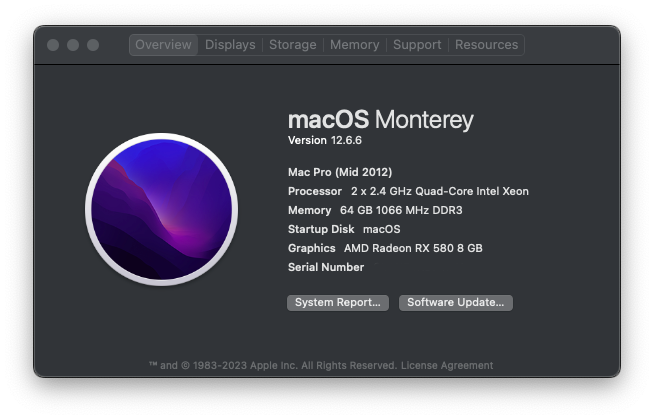
    <content type="html"><![CDATA[<p>I have a deep interest in using computers well beyond their expected shelf life. I am writing this in 2023 and have a 2012 iMac that has been in regular use up until I won this 2012 Mac Pro on eBay for the paltry sum of $147 USD. CPU performance gains were starting to plateau around the time these computers were made, and only fairly recently have newer designs such as Apple Silicon and AMD’s chiplet based CPUS begun to push the envelope again, particularly in consumer hardware. Yes, the new Apple Silicon chips and AMD’s Threadripper thrash the Intel Xeon’s in this Mac Pro, but it still holds its own against a multitude of newer CPUs and I think this is very cool.</p><p>To run a currently supported version of macOS on an older Mac you have to use <a href="https://dortania.github.io/OpenCore-Legacy-Patcher/">OpenCore Legacy Patcher</a>. This provides the environment to allow an unaltered installation of macOS, but first things first…</p><p><b>Do not even attempt to install a version newer than macOS High Sierra unless you have a Metal compatible graphics card.</b></p><p>I learned this the hard way. If you attempt to use OCLP to install a version of the macOS that requires a Metal capable GPU, and you do not have one, you will end up with a blank screen. You won’t even be able to get into the normal Mac boot picker screen, Internet Recovery, anything. You will be terrified that you broke your Mac and will be frantically searching internet forums while drinking yourself into a tupor.</p><p><b>Don’t do this.</b> </p><p>I also recommend that if you have a currently booting install of a currently supported macOS on your stock system to <b>preserve that drive</b>. On the Mac Pro you can easily just pull that drive out to keep on hand in case things go wrong. <b>Once you go down the path of OCLP you will not be able to boot from the stock card. You will not have a boot menu. Getting back to normal will be a pain in the ass.</b></p><p>After learning my lesson, I grabbed the cheapest lowest power GPU I could find locally, which was an AMD RX 550 4GB. I chose this because I read it was supported and I didn’t have to worry about power requirements. I do not have high demands for graphics, so I hoped this card would suit me for a while.</p><p>The RX 550 allowed me to get macOS Monterey installed and booting, however; hardware accelleration does not work. The model I have is a PowerColor Radeon RX 550 4GB.</p><p>Of course I found this bit of <a href="https://dortania.github.io/GPU-Buyers-Guide/modern-gpus/amd-gpu.html#polaris-10-and-20-series">documentation</a> after having bought the card, which says to avoid PowerColor branded cards. </p><p><b>Another lesson:</b> OpenCore is a project for hackintoshes that also happens to have a patching tool for legacy Macs. Most things are documented, but I found that I had to look at the hackintosh stuff too for a fuller picture. Fools rush in and I am a fool.</p><p>The good news is, at this point I knew I hadn’t ruined anything, the Mac is booting. Now I just needed to settle the graphics issue once and for all…</p><p><b> Read the <a href="https://dortania.github.io/GPU-Buyers-Guide">GPU Buyers Guide</a>. Make your life easy. </b></p><p>And read it carefully. There are a number of gotchas such as brand and power consumption. Some cards have issues with macOS even if the chipset is supported (like the PowerColor cards), and some more powerful cards require more power than <a href="https://thehouseofmoth.com/mac-pro-pixlas-mod-is-it-really-needed/">experts in the community</a> think the Mac Pro motherboard can supply.</p><p>For funky cards, you can apparently flash a new vBIOS onto them, or spoof the device ID so that macOS thinks it is a different card. Or, you can just sell or return your non-macOS-friendly card and get a different one. I chose the latter option.</p><p>I am also not interested in modifying the power supply on my Mac Pro. If I needed modern high end graphics performance, maybe I would, or maybe I’d just buy or build a newer computer. This is, at the time of writing this, an 11 year old computer. Expectations should be managed.</p><p>Apple has an old <a href="https://support.apple.com/en-us/HT208898">support page</a> mentioning specific card makes and models that work in the Mac Pro. I purchased a card from this list, the <a href="https://www.sapphiretech.com/en/consumer/pulse-rx-580-8g-g5#Specification">SAPPHIRE Radeon PULSE RX 580 8GB GDDR5</a>.</p><p>This card requires an 8-pin power connector, so an adapter cable is required. I used <a href="https://www.amazon.com/gp/product/B07P82ZH22/ref=ppx_od_dt_b_asin_title_s00?ie=UTF8&psc=1">this one</a> from Amazon.</p><p><img src="/2023/06/08/macpro/IMG_2686.jpg" alt="Image of a Mac Pro with a Sapphire Radeon RX 580 installed"></p><p>After installing a proper graphics card I was able to boot into macOS Monterey with full graphics acceleration! Now to upgrade everything else I can!</p><p><img src="/2023/06/08/macpro/AboutThisMacPro.png" alt="Image of an About This Mac screen showing dual Xeon CPUs, 64GB of RAM and a Radeon RX 580 running macOS Monterey"></p>]]></content>


    <summary type="html">&lt;p&gt;I have a deep interest in using computers well beyond their expected shelf life. I am writing this in 2023 and have a 2012 iMac that has </summary>


    <category term="apple" scheme="http://www.mwtremblay.com/tags/apple/"/>
    
    <category term="mac pro" scheme="http://www.mwtremblay.com/tags/mac-pro/"/>
    
    <category term="open core" scheme="http://www.mwtremblay.com/tags/open-core/"/>
    
    <category term="open core legacy patcher" scheme="http://www.mwtremblay.com/tags/open-core-legacy-patcher/"/>
    
    <category term="ventura" scheme="http://www.mwtremblay.com/tags/ventura/"/>
    
    <category term="monterey" scheme="http://www.mwtremblay.com/tags/monterey/"/>
    
    <category term="mac os" scheme="http://www.mwtremblay.com/tags/mac-os/"/>
    
  </entry>
  
  <entry>
    <title>Maximo 7.6.1 OOB Help Settings</title>
    <link href="http://www.mwtremblay.com/2023/01/06/Maximo-7-6-1-OOB-Help-Settings/"/>
    <id>http://www.mwtremblay.com/2023/01/06/Maximo-7-6-1-OOB-Help-Settings/</id>
    <published>2023-01-06T13:03:08.000Z</published>
    <updated>2025-08-10T19:38:41.276Z</updated>
    
    <content type="html"><![CDATA[<p>Here are the Out-Of-Box online help settings for IBM Maximo 7.6.1</p><table><tr>    <td>PROPNAME</td>    <td>PROPVALUE</td></tr><tr>    <td>mxe.help.host</td>    <td>www.ibm.com</td></tr><tr>    <td>mxe.help.maximohelplink</td>    <td>com.ibm.mam.doc,welcome.html</td></tr><tr>    <td>mxe.help.path</td>    <td>/support/knowledgecenter/</td></tr><tr>    <td>mxe.help.port</td>    <td>80</td></tr><tr>    <td>mxe.help.protocol</td>    <td>http</td></tr><tr>    <td>mxe.help.useKCHelp</td>    <td>1</td></tr><tr>    <td>mxe.help.viewsearchtiplink</td>    <td>com.ibm.mbs.doc,mbs_common/c_advanced_search_tips.html</td></tr></table>]]></content>


    <summary type="html">&lt;p&gt;Here are the Out-Of-Box online help settings for IBM Maximo 7.6.1&lt;/p&gt;
&lt;table&gt;
&lt;tr&gt;
    &lt;td&gt;PROPNAME&lt;/td&gt;
    &lt;td&gt;PROPVALUE&lt;/td&gt;
&lt;/tr&gt;
&lt;tr</summary>


    <category term="maximo" scheme="http://www.mwtremblay.com/tags/maximo/"/>
    
  </entry>
  
  <entry>
    <title>This site: Hexo on Vercel</title>
    <link href="http://www.mwtremblay.com/2022/11/13/This-site-Hexo-on-Vercel/"/>
    <id>http://www.mwtremblay.com/2022/11/13/This-site-Hexo-on-Vercel/</id>
    <published>2022-11-13T13:37:00.000Z</published>
    <updated>2024-11-02T03:32:25.809Z</updated>
    
    <content type="html"><![CDATA[<p>UPDATE Nov 2024: I have since moved this site to DigitalOcean. Nothing wrong with Vercel, but DigitalOcean provides more general cloud services and also has the ability to monitor a git repository and automatically build a Hexo site.</p><p>This is a static website built using <a href="https://www.hexo.io/">hexo.io</a>. It is deployed on <a href="https://www.vercel.com/">Vercel</a>. I write entirely in VS Code in the Markdown language. Vercel monitors a git repository for changes, and when it detects changes it runs a <code>hexo generate</code> to build the new site. I basically manage zero infrastructure and have a simple static site. No big CMS solution, or tons of code that has to run in your browser. This is ideal for me, as someone who fondly remembers the internet made of personal sites made with very simple HTML markup.</p><p>The workflow with Hexo is quite simple:</p><figure class="highlight plaintext"><table><tr><td class="gutter"><pre><span class="line">1</span><br></pre></td><td class="code"><pre><span class="line">hexo new draft &quot;This very post&quot;</span><br></pre></td></tr></table></figure><p>This creates a Markdown file under /source/_drafts called This-very-post.md. Open this in your favored editor and write blog posts as comfortably as you would write code.</p><figure class="highlight plaintext"><table><tr><td class="gutter"><pre><span class="line">1</span><br></pre></td><td class="code"><pre><span class="line">hexo publish This-very-post</span><br></pre></td></tr></table></figure><p>When you are done writing your post it’s easy to publish it. This will at a timestamp to the posts’s front matter (the bit at the top) and move the file to /source/_posts.</p><figure class="highlight plaintext"><table><tr><td class="gutter"><pre><span class="line">1</span><br></pre></td><td class="code"><pre><span class="line">hexo generate</span><br></pre></td></tr></table></figure><p>The generate command will build the actual static website files. To preview your site just do</p><figure class="highlight plaintext"><table><tr><td class="gutter"><pre><span class="line">1</span><br></pre></td><td class="code"><pre><span class="line">hexo server</span><br></pre></td></tr></table></figure><p>…and your site will be at <a href="http://localhost:4000/">http://localhost:4000</a></p><p>It is not complicated to update posts after they have been published. Simply edit the Markdown in /source/_posts. You can even adjust the timestamps or anything else in the front matter. The <code>hexo generate</code> command will have no problems updating your blog.</p><p>If for some reason you want or need to build your site from a clean starting point, just run…</p><figure class="highlight plaintext"><table><tr><td class="gutter"><pre><span class="line">1</span><br></pre></td><td class="code"><pre><span class="line">hexo clean</span><br></pre></td></tr></table></figure><p>… all of your post data will still be there. Hexo will just purge its generated content so you can do a clean build.</p><p>Hexo supports plugins as well. I use <a href="https://github.com/hexojs/hexo-generator-feed">hexo-generator-feed</a> to publish the site’s RSS feed. Because hexo is a node.js application you can install plugins with <code>npm</code>. </p><p>Configuring various options for your site is simple too. Hexo reads your settings in <code>_config.yml</code>. The developers of hexo, plugins, and themes will provide guidance on what to put in your <code>_config.yml</code> to set them up.</p><p>I really enjoy blogging this way. I don’t have to login to some website or app and suffer some half-baked editor or deal with awful Markdown support and rendering. Best of all I have all my content saved automatically as source code. My content itself is not stored in any proprietary format, just Markdown.</p><p>For fun, to generate my site and send it up to git I have a little script called <code>yeet.sh</code>. Nothing fancy at all but it saves typing.</p><figure class="highlight plaintext"><table><tr><td class="gutter"><pre><span class="line">1</span><br><span class="line">2</span><br><span class="line">3</span><br><span class="line">4</span><br></pre></td><td class="code"><pre><span class="line">#!/bin/bash</span><br><span class="line">echo &quot;Yeeting the blog&quot;</span><br><span class="line">hexo generate &amp;&amp; git add * &amp;&amp; git commit -m &quot;update&quot; &amp;&amp; git push</span><br><span class="line">echo &quot;The blog has been yote&quot;</span><br></pre></td></tr></table></figure><p>The internet is for information, not tons of JavaScript and trackers and ads or obstrusive UI. That’s why I like this. If you visit this site all you get is the content. There’s nothing else here, and the effort for me is minimal!</p>]]></content>


    <summary type="html">&lt;p&gt;UPDATE Nov 2024: I have since moved this site to DigitalOcean. Nothing wrong with Vercel, but DigitalOcean provides more general cloud se</summary>


  </entry>
  
  <entry>
    <title>Maximo database refreshes</title>
    <link href="http://www.mwtremblay.com/2022/11/09/Maximo-database-refreshes/"/>
    <id>http://www.mwtremblay.com/2022/11/09/Maximo-database-refreshes/</id>
    <published>2022-11-09T13:30:33.000Z</published>
    <updated>2025-08-10T19:38:48.684Z</updated>
    
    <content type="html"><![CDATA[<p>While developing for Maximo you will sometimes need to refresh your development environment from production so that you can have fresher data or work with, or to return your development environment to the production baseline if something has gone awry.</p><p>There are some configuration items I have updated in the past before starting the app back up and disabling Admin Mode.</p><p>If you have maxmessages that reference your environment name, you should update these.</p><figure class="highlight sql"><table><tr><td class="gutter"><pre><span class="line">1</span><br><span class="line">2</span><br><span class="line">3</span><br><span class="line">4</span><br></pre></td><td class="code"><pre><span class="line"><span class="keyword">UPDATE</span> maximo.maxmessages</span><br><span class="line">   <span class="keyword">SET</span> <span class="keyword">value</span> <span class="operator">=</span> <span class="string">&#x27;DEV - &#x27;</span> <span class="operator">||</span> <span class="keyword">value</span></span><br><span class="line"> <span class="keyword">WHERE</span> msggroup <span class="operator">=</span> <span class="string">&#x27;system&#x27;</span></span><br><span class="line">   <span class="keyword">AND</span> msgkey <span class="operator">=</span> <span class="string">&#x27;example&#x27;</span>;</span><br></pre></td></tr></table></figure><p>Disable External Systems so that you can control which start processing in your development environment. Maybe you have some that are only intended for production.</p><figure class="highlight sql"><table><tr><td class="gutter"><pre><span class="line">1</span><br><span class="line">2</span><br></pre></td><td class="code"><pre><span class="line"><span class="keyword">UPDATE</span> maximo.maxextsystem</span><br><span class="line">   <span class="keyword">SET</span> enabled <span class="operator">=</span> <span class="number">0</span>;</span><br></pre></td></tr></table></figure><p>Update URLs for your BIRT, Cognos, hostname, webapp, etc.</p><figure class="highlight sql"><table><tr><td class="gutter"><pre><span class="line">1</span><br><span class="line">2</span><br><span class="line">3</span><br><span class="line">4</span><br><span class="line">5</span><br><span class="line">6</span><br><span class="line">7</span><br><span class="line">8</span><br><span class="line">9</span><br><span class="line">10</span><br><span class="line">11</span><br><span class="line">12</span><br><span class="line">13</span><br><span class="line">14</span><br><span class="line">15</span><br><span class="line">16</span><br><span class="line">17</span><br><span class="line">18</span><br><span class="line">19</span><br><span class="line">20</span><br><span class="line">21</span><br><span class="line">22</span><br><span class="line">23</span><br><span class="line">24</span><br><span class="line">25</span><br><span class="line">26</span><br><span class="line">27</span><br><span class="line">28</span><br><span class="line">29</span><br><span class="line">30</span><br></pre></td><td class="code"><pre><span class="line"><span class="comment">-- BIRT</span></span><br><span class="line"><span class="keyword">UPDATE</span> maximo.maxpropvalue</span><br><span class="line">  <span class="keyword">SET</span> propvalue <span class="operator">=</span> <span class="string">&#x27;https://mydevenv.com&#x27;</span></span><br><span class="line"><span class="keyword">WHERE</span> propname <span class="operator">=</span> <span class="string">&#x27;mxe.report.birt.viewerurl&#x27;</span></span><br><span class="line">;</span><br><span class="line"></span><br><span class="line"><span class="comment">-- COGNOS</span></span><br><span class="line"><span class="keyword">UPDATE</span> maximo.maxpropvalue</span><br><span class="line">   <span class="keyword">SET</span> propvalue <span class="operator">=</span> <span class="string">&#x27;https://mydevenv.com&#x27;</span></span><br><span class="line"> <span class="keyword">WHERE</span> propname <span class="operator">=</span> <span class="string">&#x27;mxe.report.cognos.serverURL&#x27;</span></span><br><span class="line">   ;</span><br><span class="line"></span><br><span class="line"><span class="comment">-- webappurl</span></span><br><span class="line"><span class="keyword">UPDATE</span> maximo.maxpropvalue</span><br><span class="line">   <span class="keyword">SET</span> propvalue <span class="operator">=</span> <span class="string">&#x27;https://mydevenv.com&#x27;</span></span><br><span class="line"> <span class="keyword">WHERE</span> propname <span class="operator">=</span> <span class="string">&#x27;mxe.int.webappurl&#x27;</span></span><br><span class="line"> ;</span><br><span class="line"></span><br><span class="line"><span class="comment">-- hostname</span></span><br><span class="line"><span class="keyword">UPDATE</span> maximo.maxpropvalue</span><br><span class="line">   <span class="keyword">SET</span> propvalue <span class="operator">=</span> <span class="string">&#x27;https://mydevenv.com&#x27;</span></span><br><span class="line"> <span class="keyword">WHERE</span> propname <span class="operator">=</span> <span class="string">&#x27;mxe.hostname&#x27;</span></span><br><span class="line"> ;</span><br><span class="line"></span><br><span class="line"> <span class="comment">--help host</span></span><br><span class="line"></span><br><span class="line"> <span class="keyword">UPDATE</span> maximo.maxpropvalue</span><br><span class="line">   <span class="keyword">SET</span> propvalue <span class="operator">=</span> <span class="string">&#x27;https://mydevenv.com&#x27;</span></span><br><span class="line"> <span class="keyword">WHERE</span> propname <span class="operator">=</span> <span class="string">&#x27;mxe.help.host&#x27;</span></span><br><span class="line"> ;</span><br></pre></td></tr></table></figure><p>Update your DOCLINKS settings to point to the correct URL</p><figure class="highlight sql"><table><tr><td class="gutter"><pre><span class="line">1</span><br><span class="line">2</span><br><span class="line">3</span><br><span class="line">4</span><br></pre></td><td class="code"><pre><span class="line"><span class="keyword">UPDATE</span> maximo.maxpropvalue</span><br><span class="line">  <span class="keyword">SET</span> propvalue <span class="operator">=</span> <span class="string">&#x27;C:\mydoclinks=https://mydevenv.com&#x27;</span></span><br><span class="line"><span class="keyword">WHERE</span> propname <span class="operator">=</span> <span class="string">&#x27;mxe.docklink.path01&#x27;</span></span><br><span class="line">;</span><br></pre></td></tr></table></figure><p>These are a just a few things you may want to update when doing a refresh. There may be other things specific to your environment you would want to do, such as setting the status or permissions of certain users and ensuring certain crontask instances are configured properly for the target environment.</p>]]></content>


    <summary type="html">&lt;p&gt;While developing for Maximo you will sometimes need to refresh your development environment from production so that you can have fresher </summary>


    <category term="maximo" scheme="http://www.mwtremblay.com/tags/maximo/"/>
    
  </entry>
  
  <entry>
    <title>WebSphere manage profiles interactive tool</title>
    <link href="http://www.mwtremblay.com/2022/11/08/WebSphere-manage-profiles-interactive-tool/"/>
    <id>http://www.mwtremblay.com/2022/11/08/WebSphere-manage-profiles-interactive-tool/</id>
    <published>2022-11-08T14:14:46.000Z</published>
    <updated>2025-08-10T19:39:05.950Z</updated>
    
    <content type="html"><![CDATA[<p>I recently got a tip from IBM support about a friendler tool to use for creating WebSphere profiles. Previously I had used the graphical WebSphere Toolkit to create profiles on a new install but on the latest Windows Server 2019 images we were issued this tool would no longer work. It would crash with a Java error. IBM support discouraged use of this tool, instead they said to use the manageprofiles.bat command line tool. This tool is fine, however it is tedious to use because you have to enter in so many command line parameters. </p><p>IBM has a better tool called Manage Profiles Interactive. This tool provides a nice menu in the command prompt and steps you through the required and optional parameters to get your profiles created. I found this to be very easy to use and to document for the next person who has to do a server install from scratch in our environment.</p><p><a href="https://www.ibm.com/support/pages/using-manage-profiles-interactive-tool-create-new-profiles-websphere-application-server">Manage Profiles Interactive</a></p><p>I definitely recommend this tool!</p>]]></content>


    <summary type="html">&lt;p&gt;I recently got a tip from IBM support about a friendler tool to use for creating WebSphere profiles. Previously I had used the graphical </summary>


    <category term="websphere" scheme="http://www.mwtremblay.com/tags/websphere/"/>
    
    <category term="ibm" scheme="http://www.mwtremblay.com/tags/ibm/"/>
    
  </entry>
  
  <entry>
    <title>Maximo custom cron</title>
    <link href="http://www.mwtremblay.com/2022/11/07/maximo-custom-cron/"/>
    <id>http://www.mwtremblay.com/2022/11/07/maximo-custom-cron/</id>
    <published>2022-11-07T22:49:23.000Z</published>
    <updated>2025-08-10T19:37:15.009Z</updated>
    
    <content type="html"><![CDATA[<p>If you need to create a custom cron task for IBM Maximo using Java here is some code to get you started.</p><figure class="highlight java"><table><tr><td class="gutter"><pre><span class="line">1</span><br><span class="line">2</span><br><span class="line">3</span><br><span class="line">4</span><br><span class="line">5</span><br><span class="line">6</span><br><span class="line">7</span><br><span class="line">8</span><br><span class="line">9</span><br><span class="line">10</span><br><span class="line">11</span><br><span class="line">12</span><br><span class="line">13</span><br><span class="line">14</span><br><span class="line">15</span><br><span class="line">16</span><br><span class="line">17</span><br><span class="line">18</span><br><span class="line">19</span><br><span class="line">20</span><br><span class="line">21</span><br><span class="line">22</span><br><span class="line">23</span><br><span class="line">24</span><br><span class="line">25</span><br><span class="line">26</span><br><span class="line">27</span><br><span class="line">28</span><br><span class="line">29</span><br><span class="line">30</span><br><span class="line">31</span><br><span class="line">32</span><br><span class="line">33</span><br><span class="line">34</span><br><span class="line">35</span><br><span class="line">36</span><br><span class="line">37</span><br><span class="line">38</span><br></pre></td><td class="code"><pre><span class="line"><span class="keyword">import</span> psdi.server.SimpleCronTask;</span><br><span class="line"><span class="keyword">import</span> psdi.server.CrontaskParamInfo;</span><br><span class="line"><span class="keyword">import</span> psdi.util.MXException;</span><br><span class="line"><span class="keyword">import</span> java.rmi.RemoteException</span><br><span class="line"></span><br><span class="line"><span class="keyword">public</span> <span class="keyword">class</span> <span class="title class_">MyCustomCron</span> <span class="keyword">extends</span> <span class="title class_">SimpleCronTask</span> &#123;</span><br><span class="line"></span><br><span class="line">    <span class="comment">// You must extend SimpleCronTask and must override</span></span><br><span class="line">    <span class="comment">// cronAction()</span></span><br><span class="line"></span><br><span class="line">    <span class="comment">// Your main processing goes in cronAction()</span></span><br><span class="line"></span><br><span class="line">    <span class="meta">@Override</span></span><br><span class="line">    <span class="keyword">public</span> <span class="keyword">void</span> <span class="title function_">cronAction</span><span class="params">()</span>&#123;</span><br><span class="line">        <span class="comment">// Do stuff here</span></span><br><span class="line"></span><br><span class="line">        <span class="comment">// How to access a parameter if you are using them</span></span><br><span class="line">        <span class="type">String</span> <span class="variable">param</span> <span class="operator">=</span> <span class="built_in">super</span>.getParamAsString(<span class="string">&quot;Param 1);</span></span><br><span class="line"><span class="string">    &#125;</span></span><br><span class="line"><span class="string"></span></span><br><span class="line"><span class="string">    // If you want to use parameters you override getParameters()</span></span><br><span class="line"><span class="string"></span></span><br><span class="line"><span class="string">    @Override</span></span><br><span class="line"><span class="string">    public CronTaskParamInfo[] getParameters() throws MXException, RemoteException &#123;</span></span><br><span class="line"><span class="string">        CrontakParamInfo parameters[] = new CronTaskParamInfo[2];</span></span><br><span class="line"><span class="string">        parameters[0] = new CrontaskParamInfo();</span></span><br><span class="line"><span class="string">        parameters[0].setName(&quot;</span>Param <span class="number">1</span><span class="string">&quot;);</span></span><br><span class="line"><span class="string">        parameters[0].setDefault(&quot;</span>Default Value<span class="string">&quot;);</span></span><br><span class="line"><span class="string">        parameters[1].setName(&quot;</span>Param <span class="number">2</span><span class="string">&quot;);</span></span><br><span class="line"><span class="string">        parameters[1].setDefault(&quot;</span>Default Value<span class="string">&quot;);</span></span><br><span class="line"><span class="string"></span></span><br><span class="line"><span class="string">        return parameters;</span></span><br><span class="line"><span class="string">    &#125;</span></span><br><span class="line"><span class="string"></span></span><br><span class="line"><span class="string">&#125;</span></span><br><span class="line"><span class="string"></span></span><br><span class="line"><span class="string"></span></span><br><span class="line"><span class="string"></span></span><br></pre></td></tr></table></figure>]]></content>


    <summary type="html">&lt;p&gt;If you need to create a custom cron task for IBM Maximo using Java here is some code to get you started.&lt;/p&gt;
&lt;figure class=&quot;highlight jav</summary>


    <category term="maximo" scheme="http://www.mwtremblay.com/tags/maximo/"/>
    
    <category term="java" scheme="http://www.mwtremblay.com/tags/java/"/>
    
  </entry>
  
  <entry>
    <title>Experimenting with the vagrant-qemu-provider</title>
    <link href="http://www.mwtremblay.com/2022/11/06/Experimenting-with-the-vagrant-qemu-provider/"/>
    <id>http://www.mwtremblay.com/2022/11/06/Experimenting-with-the-vagrant-qemu-provider/</id>
    <published>2022-11-06T22:49:05.000Z</published>
    <updated>2024-02-17T18:45:13.751Z</updated>
    
    <content type="html"><![CDATA[<p>Today I came across a qemu provider for Vagrant. I have a PC set up with Proxmox, however; I kind of don’t want to have this machine hooked up and running all of the time. It is very underutilized. I only use it when I have the time or interest to experiment.</p><p>Setup is easy:</p><figure class="highlight plaintext"><table><tr><td class="gutter"><pre><span class="line">1</span><br><span class="line">2</span><br></pre></td><td class="code"><pre><span class="line">brew install qemu</span><br><span class="line">vagrant plugin install vagrant-qemu</span><br></pre></td></tr></table></figure><p>And then we can try using a provided example:</p><figure class="highlight plaintext"><table><tr><td class="gutter"><pre><span class="line">1</span><br><span class="line">2</span><br></pre></td><td class="code"><pre><span class="line">vagrant init ppggff/centos-7-aarch64-2009-4K</span><br><span class="line">vagrant up --provider qemu</span><br></pre></td></tr></table></figure><p>Vagrant will start setting things up and you will be prompted for a username and password for SMB.</p><p>At this point you will probably get an error if you are on macOS complaining about an authentication failure for SMB. All you need to do is set up SMB File Sharing for macOS if you haven’t done so already. HashiCorp has a note on it <a href="https://developer.hashicorp.com/vagrant/docs/synced-folders/smb">here</a>.</p><p>Once the qemu VM has been started up by Vagrant you can connect to it with <code>vagrant ssh</code> <br/></p><p>Your home directory on your host will be mapped to <code>/vagrant</code> in the VM.</p><p>This solution seems the best for me right now on the M1 Mac. Qemu is very powerful and should even allow me to run operating systems for architectures other than ARM using Vagrant.</p>]]></content>


    <summary type="html">&lt;p&gt;Today I came across a qemu provider for Vagrant. I have a PC set up with Proxmox, however; I kind of don’t want to have this machine hook</summary>


  </entry>
  
  <entry>
    <title>Diving into DevOps - Proxmox SSL</title>
    <link href="http://www.mwtremblay.com/2022/10/02/Diving-into-DevOps-Proxmox-SSL/"/>
    <id>http://www.mwtremblay.com/2022/10/02/Diving-into-DevOps-Proxmox-SSL/</id>
    <published>2022-10-02T21:47:43.000Z</published>
    <updated>2024-02-17T18:45:13.751Z</updated>
    
    <content type="html"><![CDATA[<p>Today I learned that for self-signed certs you need to add the root CA of your server to Vagrant’s cacert.pem</p><p>On my system this file is at /opt/vagrant/embedded/cacert.pem</p><p>The certificate for Proxmox’s self-signer root is at /etc/pve/pve-root-ca.pem</p><p>Just copy the contents of pve-root-ca.pem and paste it at the bottom of cacert.pem. This should resolve issues with Vagrant and self-signed certs.</p><p>References:</p><p><a href="https://forum.proxmox.com/threads/vagrant-proxmox-issue.36204/">https://forum.proxmox.com/threads/vagrant-proxmox-issue.36204/</a></p>]]></content>


    <summary type="html">&lt;p&gt;Today I learned that for self-signed certs you need to add the root CA of your server to Vagrant’s cacert.pem&lt;/p&gt;
&lt;p&gt;On my system this fi</summary>


  </entry>
  
  <entry>
    <title>Diving into DevOps - Vagrancy</title>
    <link href="http://www.mwtremblay.com/2022/10/02/Diving-into-DevOps-Vagrancy/"/>
    <id>http://www.mwtremblay.com/2022/10/02/Diving-into-DevOps-Vagrancy/</id>
    <published>2022-10-02T21:47:09.000Z</published>
    <updated>2024-02-17T18:45:13.751Z</updated>
    
    <content type="html"><![CDATA[<p>Ahh yes, the everything-as-code infrastructure dream. I have been familiar with the concepts for a long time, and know the names and functions of many tools. I can create infrastructure on AWS or Azure, I can grab magic ephemeral servers from Docker, etc. I have not had any opportunity to use any of this in a professional environment. The places where I have worked are very slow to adopt new methodologies and technologies. This has posed a bit of an issue for me, because I typically learn things on the job. I like the immediate and direct application of skill to keep the world from burning down.</p><p>So, I am playing with things from a book. DevOps for The Desperate by Bradley Smith, published by the fantastic No Starch Press. The book takes you through examples with Vagrant, Ansible, Docker, and Kubernetes. It’ s a bit of a crash course.</p><p>I ran into some challenges almost immediately. The examples are written primarily from the perspective of controlling VirtualBox with Vagrant. I am using an M1 based MacBook Air, which VirtualBox does not support. The book provides examples on how to use different providers with Vagrant, cool, I’m not totally dead in the water.</p><figure class="highlight plaintext"><table><tr><td class="gutter"><pre><span class="line">1</span><br></pre></td><td class="code"><pre><span class="line">vagrant plugin install vagrant-parallels </span><br></pre></td></tr></table></figure><p>This command installs the plugin which adds Parallels as a provider for Vagrant. The catch is that only Parallels Pro supports being remotely controlled. I do not currently have Parallels Pro, but I do have a Proxmox server.</p><figure class="highlight plaintext"><table><tr><td class="gutter"><pre><span class="line">1</span><br></pre></td><td class="code"><pre><span class="line">vagrant plugin install vagrant-proxmox</span><br></pre></td></tr></table></figure><p>This is the point I learned of Ruby dependency hell.</p><p>The original GitHub repo for vagrant-proxmox (which contains the version which is on RubyGems) appears to be abandoned. It has out-of-date dependencies which Ruby’s package manager was unable to resolve. Fortunately someone else forked this repo and have kept the dependencies more up-to-date. So all I had to do was build the gem and install. </p><p>Right…</p><p>Right?</p><p>Well, no. </p><p>First I learned the version of Ruby that Apple ships with macOS is an outdated version packaged in a Universal Binary. This post explains everything. I was getting errors from the FFI library as described. I decided to deal with this by installing the latest version of Ruby from Brew</p><figure class="highlight plaintext"><table><tr><td class="gutter"><pre><span class="line">1</span><br></pre></td><td class="code"><pre><span class="line">brew install ruby</span><br></pre></td></tr></table></figure><p>And then update my PATH as described in the warnings from Brew so that my terminal grabs the right Ruby</p><figure class="highlight plaintext"><table><tr><td class="gutter"><pre><span class="line">1</span><br></pre></td><td class="code"><pre><span class="line">echo &#x27;export PATH=&quot;/opt/homebrew/opt/ruby/bin:$PATH&quot;&#x27; &gt;&gt; ~/.zshrc</span><br></pre></td></tr></table></figure><p>So now I have the latest arm64 Ruby and it’s time to build that gem from the rakefile…</p><figure class="highlight plaintext"><table><tr><td class="gutter"><pre><span class="line">1</span><br></pre></td><td class="code"><pre><span class="line">rake build</span><br></pre></td></tr></table></figure><p>Which tells me…</p><figure class="highlight plaintext"><table><tr><td class="gutter"><pre><span class="line">1</span><br><span class="line">2</span><br><span class="line">3</span><br></pre></td><td class="code"><pre><span class="line">“Could not find rake-10.5.0 in any of the sources</span><br><span class="line"></span><br><span class="line">Run `bundle install` to install missing gems.”</span><br></pre></td></tr></table></figure><p>Okay, great.</p><figure class="highlight plaintext"><table><tr><td class="gutter"><pre><span class="line">1</span><br></pre></td><td class="code"><pre><span class="line">bundle install</span><br></pre></td></tr></table></figure><p>Which tells me…</p><figure class="highlight plaintext"><table><tr><td class="gutter"><pre><span class="line">1</span><br></pre></td><td class="code"><pre><span class="line">“minitest-5.14.0 requires ruby version ~&gt; 2.2, which is incompatible with the current version, ruby 3.1.2p20”</span><br></pre></td></tr></table></figure><p>I found a suggestion to delete Gemfile.lock, so I did and ran bundle install again.</p><figure class="highlight plaintext"><table><tr><td class="gutter"><pre><span class="line">1</span><br><span class="line">2</span><br><span class="line">3</span><br><span class="line">4</span><br><span class="line">5</span><br><span class="line">6</span><br><span class="line">7</span><br><span class="line">8</span><br><span class="line">9</span><br></pre></td><td class="code"><pre><span class="line">“Bundler found conflicting requirements for the Ruby version:</span><br><span class="line"></span><br><span class="line">  In Gemfile:</span><br><span class="line"></span><br><span class="line">    Ruby</span><br><span class="line"></span><br><span class="line">    vagrant (= 2.2.4) was resolved to 2.2.4, which depends on</span><br><span class="line"></span><br><span class="line">      Ruby (~&gt; 2.2, &lt; 2.7)”</span><br></pre></td></tr></table></figure><p>Okay, my installed version of Vagrant is 2.3.1 so maybe I just need to update the gemfile and the vagrant-proxmox.gemspec.</p><p>Success! Now to try rake build again</p><figure class="highlight plaintext"><table><tr><td class="gutter"><pre><span class="line">1</span><br><span class="line">2</span><br><span class="line">3</span><br></pre></td><td class="code"><pre><span class="line">“rake aborted!</span><br><span class="line"></span><br><span class="line">Gem::LoadError: You have already activated rake 13.0.6, but your Gemfile requires rake 10.5.0. Prepending `bundle exec` to your command may solve this.”</span><br></pre></td></tr></table></figure><p>I updated the rake dependency in vagrant-proxmox.gemspec and it worked! I now have a gemfile!</p><p>Lets install it!</p><figure class="highlight plaintext"><table><tr><td class="gutter"><pre><span class="line">1</span><br></pre></td><td class="code"><pre><span class="line">vagrant plugin install ./vagrant-proxmox-0.3.0.gem</span><br></pre></td></tr></table></figure><p>Oh no I am going to implode</p><figure class="highlight plaintext"><table><tr><td class="gutter"><pre><span class="line">1</span><br><span class="line">2</span><br><span class="line">3</span><br><span class="line">4</span><br><span class="line">5</span><br><span class="line">6</span><br><span class="line">7</span><br><span class="line">8</span><br><span class="line">9</span><br><span class="line">10</span><br><span class="line">11</span><br><span class="line">12</span><br><span class="line">13</span><br><span class="line">14</span><br><span class="line">15</span><br><span class="line">16</span><br><span class="line">17</span><br><span class="line">18</span><br><span class="line">19</span><br><span class="line">20</span><br><span class="line">21</span><br><span class="line">22</span><br><span class="line">23</span><br><span class="line">24</span><br><span class="line">25</span><br></pre></td><td class="code"><pre><span class="line">“Vagrant failed to properly resolve required dependencies. These</span><br><span class="line"></span><br><span class="line">errors can commonly be caused by misconfigured plugin installations</span><br><span class="line"></span><br><span class="line">or transient network issues. The reported error is:</span><br><span class="line"></span><br><span class="line">conflicting dependencies activesupport (~&gt; 5.0) and activesupport (= 7.0.4)</span><br><span class="line"></span><br><span class="line">  Activated activesupport-7.0.4</span><br><span class="line"></span><br><span class="line">  which does not match conflicting dependency (~&gt; 5.0)</span><br><span class="line"></span><br><span class="line">  Conflicting dependency chains:</span><br><span class="line"></span><br><span class="line">    activesupport (= 7.0.4), 7.0.4 activated</span><br><span class="line"></span><br><span class="line">  versus:</span><br><span class="line"></span><br><span class="line">    vagrant-proxmox (= 0.3.0), 0.3.0 activated, depends on</span><br><span class="line"></span><br><span class="line">    activesupport (~&gt; 5.0)</span><br><span class="line"></span><br><span class="line">  Gems matching activesupport (~&gt; 5.0):</span><br><span class="line"></span><br><span class="line">    activesupport-5.2.8.1”</span><br></pre></td></tr></table></figure><p>Yet again I updated the dependency in vagrant-proxmox.gemspec, then run bundle update, then rake build. And success!! I got the plugin to install!!</p><p>So this is my first crash course into dealing with Vagrant. From here I should be able to whip up a vagrant file to control my Proxmox server instead of VirtualBox or Parallels. I will write about this later.</p><p>My fork of vagrant-proxmox lives here: <a href="https://github.com/mikeOSX/vagrant-proxmox">https://github.com/mikeOSX/vagrant-proxmox</a></p><p>References:</p><p><a href="https://stackoverflow.com/questions/17028132/vagrant-install-plugin-from-github">https://stackoverflow.com/questions/17028132/vagrant-install-plugin-from-github</a></p><p><a href="https://www.ruby-lang.org/en/documentation/installation/#homebrew">https://www.ruby-lang.org/en/documentation/installation/#homebrew</a></p><p><a href="https://github.com/lehn-etracker/vagrant-proxmox">https://github.com/lehn-etracker/vagrant-proxmox</a></p><p><a href="https://betterprogramming.pub/ruby-on-apple-silicon-m1-macs-fb159849b2f5">https://betterprogramming.pub/ruby-on-apple-silicon-m1-macs-fb159849b2f5</a></p>]]></content>


    <summary type="html">&lt;p&gt;Ahh yes, the everything-as-code infrastructure dream. I have been familiar with the concepts for a long time, and know the names and func</summary>


  </entry>
  
</feed>